Fitpiq Team
Our dedicated team at Fitpiq works with passion and zeal to help you achieve your best possible results.
As the motto of Fitpiq says, ‘choose to be fit, we are a platform that aims to promote health and well-being in an effortless manner.
Help people to make their nutrition and fitness a priority. By choosing to be fit, we are improving the quality of life, and we at Fitpiq thrive for that.
Fitpiq Team works wholeheartedly and sincerely to help you achieve your health goals in the best possible ways.
We have had a wonderful expedition reaching where we are today.
Now feel confident to provide you with professional and helpful solutions to your problems and queries in a time-effective way.
We have the vision to promote healthy and healthful eating and lifestyle practices so that everyone can attain their real-life goals.
Our team works passionately and with zeal to assist you on each and every step of the journey to reach your health objective.
Fitpiq Team believes in making health a priority for people and works endlessly towards it.
We think that achieving health goals should not feel like a burden, but it should feel like an amazing venture.
Our team thinks unique, thrives on excellence and we are go-getters. Our team will provide you with guidance and support at every step,
We make sure that our team and you work as a “WE” to help you achieve your goals.
Our objective is to understand your present health and fitness efficacy and educate what is best for you and your body.
So that we together can chalk out your health and fitness journey.
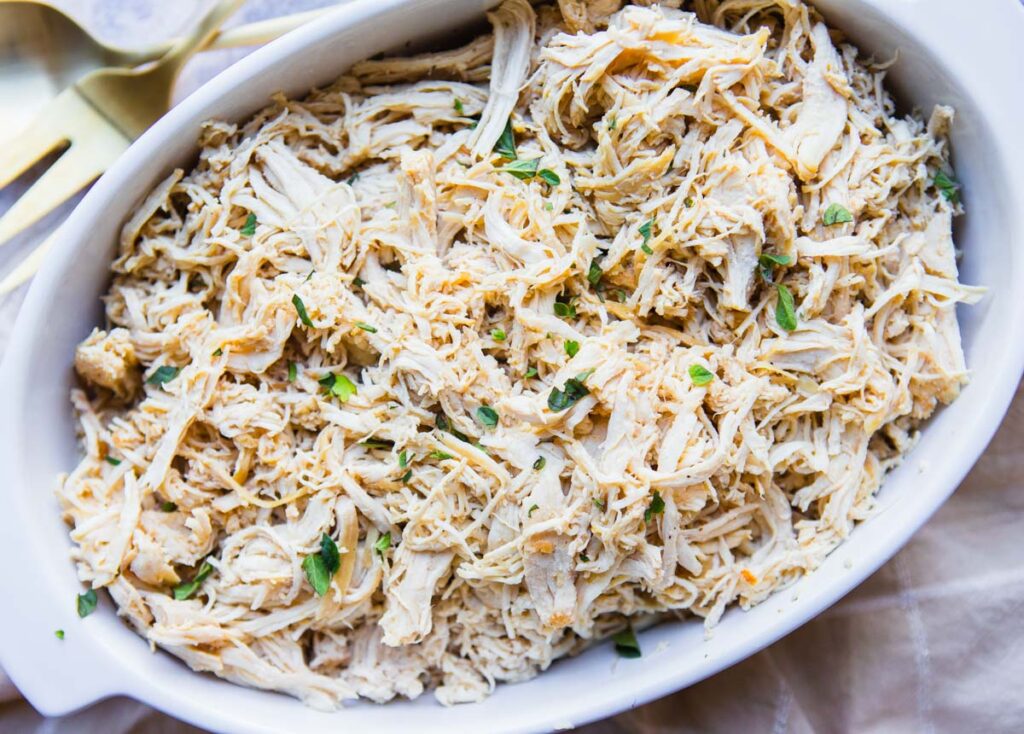
🍗🌾 Shredded Chicken Dalia (Healing One-Pot Meal)
✅ Great for: Light lunch/dinner, post-surgery diet
🥄 Ingredients:
- 1/2 cup dalia (broken wheat/bulgar wheat) – washed and drained
- 1/2 cup cooked, shredded boneless chicken
- 1 small carrot, finely chopped
- 1 small zucchini or bottle gourd (lauki), finely chopped (optional)
- 1 tsp grated ginger
- 1/4 tsp turmeric powder
- 1/2 tsp cumin seeds
- 1 tsp ghee or light oil
- Salt, to taste
- 3 cups water or light chicken broth
- Optional: few curry leaves or coriander for flavor
🔥 Instructions:
- Cook the chicken (if not already):
- Boil or pressure cook boneless chicken with a pinch of salt and turmeric.
- Once cooked, shred it into small pieces using a fork.
- Prepare the base:
- In a pressure cooker or thick-bottomed pot, heat ghee.
- Add cumin seeds (and curry leaves if using), sauté for a few seconds.
- Add grated ginger and chopped veggies. Sauté lightly (don’t brown).
- Add dalia and cook:
- Add washed dalia and turmeric. Stir for 1–2 mins.
- Pour in 3 cups water or broth.
- Add salt to taste.
- Pressure cook or simmer:
- Pressure cooker: Cook for 2–3 whistles.
- Open pot: Cover and simmer for ~25–30 minutes, stirring occasionally, until soft and porridge-like.
- Add shredded chicken:
- Once dalia is cooked, stir in shredded chicken.
- Simmer for 3–5 more minutes so flavors combine.
- Serve warm:
- Add chopped coriander (optional) and serve warm as a complete meal.
🩺 Why This is Perfect Post-Surgery:
- Dalia (broken wheat): Slow-digesting carbs, fiber, iron
- Chicken: Lean protein, supports tissue repair
- Veggies: Gentle vitamins & minerals
- Mild spices: Help digestion without irritating the gut
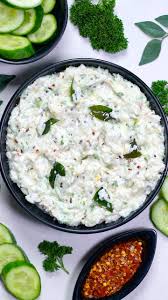
🥒 Mild Curd Rice with Grated Cucumber
✅ Great for: Light lunch or dinner
🧄 Ingredients:
- 1/2 cup rice (preferably short-grain or basmati)
- 1 to 1.5 cups plain curd (yogurt) – room temperature or slightly cool
- 1/4 to 1/2 cup water or milk – to adjust consistency
- 1/4 cup grated cucumber (peeled and deseeded if needed)
- Salt – to taste
- Optional: 1 tsp fresh grated coconut (for extra flavor)
🔥 Optional Tempering (skip if you want zero oil):
- 1 tsp ghee
- 1/4 tsp mustard seeds
- A few curry leaves
- 1 pinch grated ginger
- A pinch of asafoetida (hing) – helps reduce gas
👩🍳 Instructions:
- Cook the rice:
- Cook rice until very soft (slightly mushy is good for curd rice).
- Cool it slightly — warm is okay, but not hot (to avoid curd splitting).
- Mix the base:
- In a bowl, mix the cooked rice with curd and water (or milk).
- Adjust consistency — it should be creamy and slightly loose.
- Add salt to taste.
- Add grated cucumber:
- Mix in the fresh grated cucumber. It adds crunch and cooling.
- Tempering (optional but tasty):
- Heat ghee in a small pan.
- Add mustard seeds and let them splutter.
- Add curry leaves, ginger, and hing.
- Pour this over the curd rice and mix gently.
🥗 Serving Suggestions:
- Serve as-is, or with:
- Steamed vegetables
- Boiled moong dal
- A few soft pomegranate seeds (optional)
🩺 Why This is Perfect for Recovery:
- Curd = probiotics for gut healing
- Rice = soft carb for energy
- Cucumber = cooling and hydrating
- Very low spice and oil
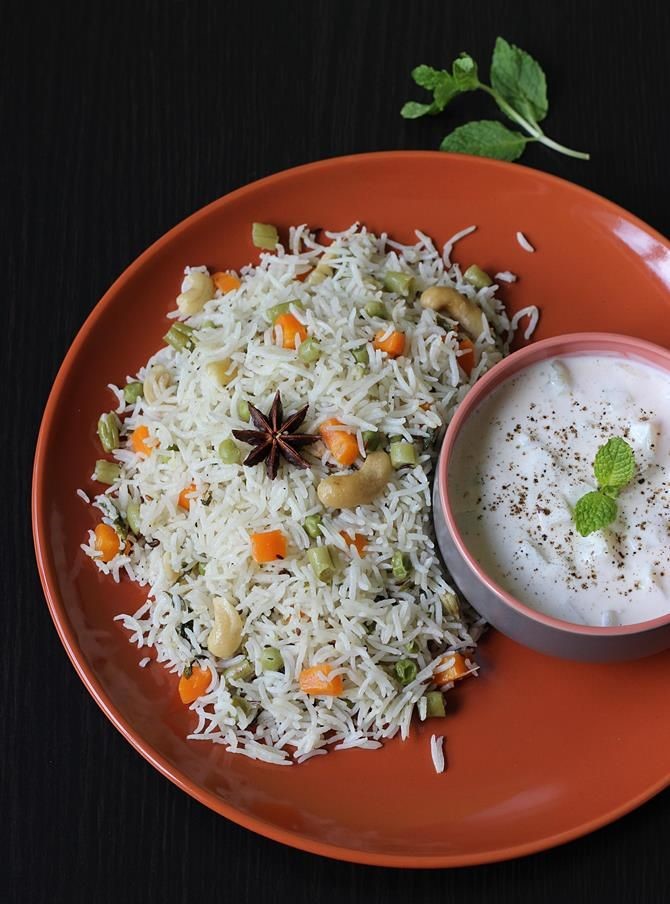
🥘 Soft Vegetable Pulao with Curd
✅ Ideal for: Light lunch or dinner
🥄 Ingredients:
For the Pulao:
- 1/2 cup basmati or short-grain rice
- 1.5 cups water
- 1/2 cup mixed soft vegetables, finely chopped:
- Carrot
- Beans
- Peas
- Bottle gourd (lauki)
- Potato (optional)
- 1/2 tsp cumin seeds
- 1 small bay leaf (optional)
- 1 tsp ghee or light oil
- 1/4 tsp turmeric powder
- Salt to taste
- Few curry leaves or a pinch of asafoetida (optional)
For Serving:
- Plain curd/yogurt, preferably homemade or probiotic-rich
- Optional: pinch of roasted cumin powder on curd
🔥 Instructions:
🥣 1. Rinse and soak rice:
- Rinse rice 2–3 times and soak for 10–15 minutes (optional but helps with softness).
🍳 2. Lightly sauté vegetables:
- In a heavy-bottomed pan or cooker, heat ghee.
- Add cumin seeds and bay leaf.
- Add vegetables and sauté for 2–3 minutes (don’t brown).
🍚 3. Add rice and spices:
- Drain and add soaked rice.
- Add turmeric and salt.
- Stir gently to coat the rice with the ghee and spices.
💧 4. Cook:
- Add 1.5 cups water.
- Bring to a boil, then cover and simmer on low heat for ~15 minutes (or pressure cook for 1 whistle).
- Let it sit for 5–10 mins after cooking, then fluff gently with a fork.
🥄 5. Serve:
- Serve warm with a side of plain curd or curd mixed with a pinch of cumin powder or chopped coriander (optional).
🩺 Why It’s Recovery-Friendly:
- Soft texture = gentle on healing gut
- Mild flavors = no harsh spices or oil
- Vegetables = fiber + micronutrients
- Curd = probiotics for gut recovery
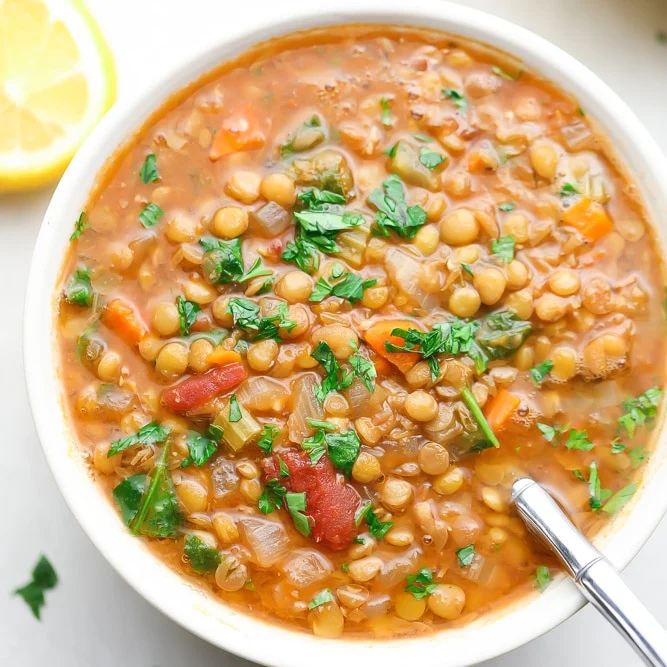
🥣 Vegetable and Lentil Stew (Indian-Style)
✅ Great for: Light lunch or dinner
🥄 Ingredients:
- 1/2 cup moong dal (yellow split lentils) or masoor dal (red lentils) — washed
- 2 cups chopped soft vegetables, such as:
- Carrot
- Bottle gourd (lauki)
- Pumpkin
- Zucchini
- Spinach (optional)
- 1 small tomato (optional — for a mild tang)
- 1/2 tsp grated ginger
- 1/4 tsp turmeric powder
- 1/2 tsp cumin seeds
- A pinch of asafoetida (hing) – optional
- 1 tsp ghee or coconut oil
- Salt, to taste
- 2.5 to 3 cups water (adjust for consistency)
- Fresh coriander, chopped (optional)
🔥 Instructions:
- Cook dal and vegetables together:
- In a pressure cooker or pot, add washed dal, chopped vegetables, turmeric, tomato (if using), and 2.5–3 cups water.
- Cook until the dal is soft and vegetables are tender.
- Pressure cooker: ~2–3 whistles
- Pot: ~25 minutes simmering
- Mash or blend slightly (optional):
- For a smoother texture, lightly mash with a ladle or blend briefly using a hand blender. This is ideal if chewing is an issue post-surgery.
- Prepare mild tempering:
- In a small pan, heat 1 tsp ghee or coconut oil.
- Add cumin seeds, let them splutter.
- Add grated ginger and hing (if using), sauté for a few seconds.
- Combine:
- Pour the tempering into the dal-vegetable mix.
- Add salt to taste and simmer for 2–3 minutes more.
- Serve:
- Garnish with coriander if desired.
- Serve warm as a soup or over soft rice.
🩺 Why It’s Ideal for Recovery:
- Moong or masoor dal = light and easy-to-digest protein
- Cooked veggies = fiber, vitamins, and minerals
- Mild spices = anti-inflammatory and digestion-friendly
- Soft texture = easy on healing gut
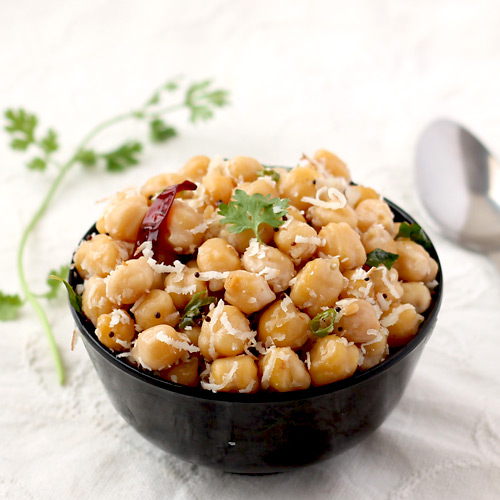
🫘 Chickpea Sundal (Light, No-Spice Healing Version)
🥄 Ingredients:
- 1 cup white chickpeas (kabuli chana) – soaked overnight & boiled until soft
- 1 tsp coconut oil or ghee
- 1/2 tsp mustard seeds
- 1 tsp urad dal (optional – can skip if digestion is weak)
- 6–8 curry leaves (optional but aromatic)
- 1 tbsp grated fresh coconut (adds flavor and healthy fats)
- A pinch of asafoetida (hing) – optional, helps reduce gas
- Salt to taste
🔥 Instructions:
- Cook the chickpeas:
- Soak overnight or for at least 6–8 hours.
- Pressure cook or boil until soft but not mushy. Drain excess water.
- Prepare tempering:
- Heat coconut oil or ghee in a pan.
- Add mustard seeds and let them splutter.
- (Optional) Add urad dal and curry leaves.
- Add a pinch of hing if using.
- Add chickpeas:
- Add the cooked chickpeas to the pan and mix well.
- Add salt to taste.
- Stir for 1–2 minutes to let flavors combine.
- Finish:
- Turn off the heat and add grated coconut.
- Mix gently and serve warm.
🩺 Why It’s Great Post-Surgery:
- Chickpeas = great plant-based protein and fiber.
- No chili, garlic, or onion = easy on the gut.
- Coconut = adds healthy fats and flavor.
- Minimal oil, no frying = digestion-friendly.
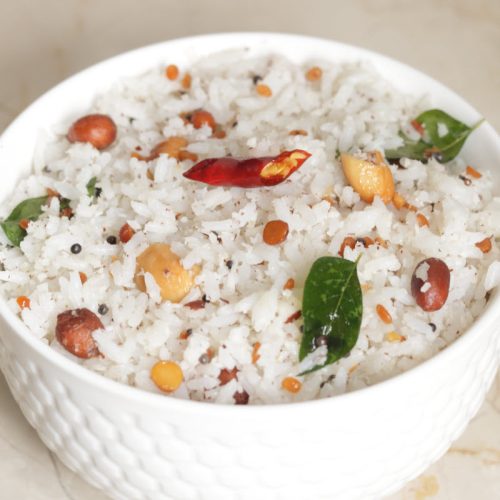
🥥 Coconut Rice (Light, Indian Style, No Spice)
🥄 Ingredients:
- 1 cup cooked rice (preferably short-grain or basmati)
- 1/3 cup freshly grated coconut (or unsweetened desiccated coconut)
- 1 tsp coconut oil (or regular ghee)
- 1/2 tsp mustard seeds
- 5–6 curry leaves (optional but aromatic)
- 1 tsp urad dal (split black gram) – optional for texture
- 1–2 tbsp chopped fresh coriander (optional)
- Salt to taste
- Optional: A pinch of asafoetida (hing) for digestion
🔥 Instructions:
- Prepare the rice:
- Cook rice until soft but not mushy. Let it cool slightly so it doesn’t break when mixing.
- Prepare the tempering:
- Heat coconut oil or ghee in a small pan.
- Add mustard seeds and let them splutter.
- Add curry leaves and urad dal (if using); sauté until lightly golden.
- (Optional: Add a pinch of hing for digestive aid.)
- Mix in coconut:
- Lower the heat and add the grated coconut.
- Sauté for 30–60 seconds just to warm it slightly (don’t brown it).
- Combine:
- Add the tempering + coconut mix to the cooked rice.
- Sprinkle salt to taste.
- Gently mix everything to coat the rice evenly.
- Garnish with fresh coriander if using.
🥣 Serving Suggestions:
- Pair with plain curd, boiled moong dal, or mild vegetable stew.
- For protein, add a few pieces of soft boiled egg or steamed chicken on the side.
✅ Post-Surgery Benefits:
- Coconut: Rich in healthy fats, aids healing, supports digestion.
- Rice: Easily digestible carb for energy.
- No chili, no onion, no heavy spices — perfect for recovery.
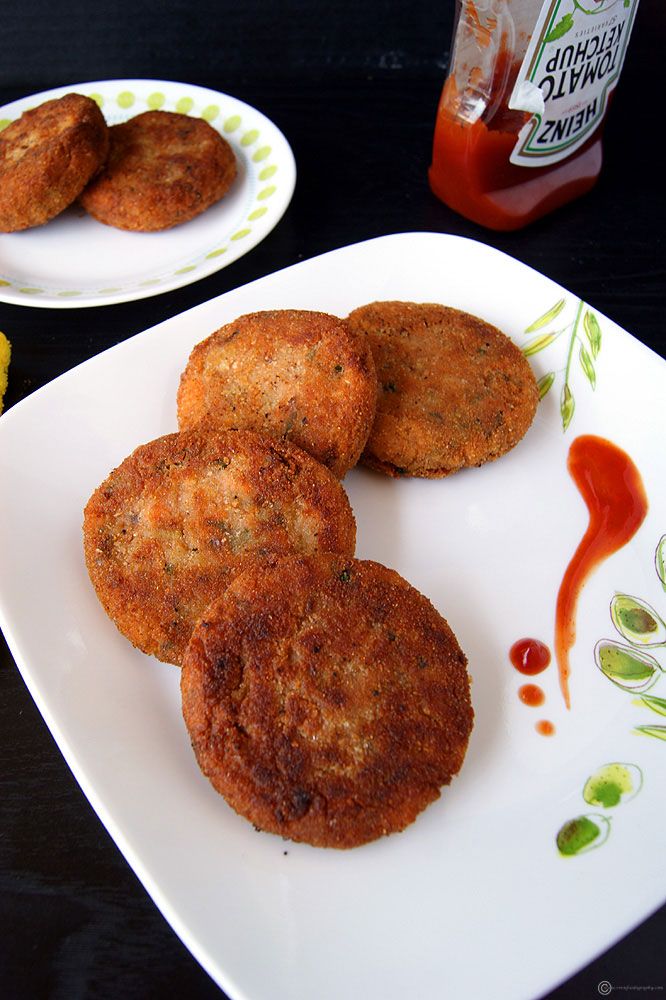
🥕🟢 Steamed Carrot and Pea Cutlets (No Fry)
🧑🍳 Cooking Method: Steaming (no frying)
🥄 Ingredients:
- 1 cup grated carrot
- 1/2 cup boiled green peas (lightly mashed)
- 1 small boiled potato (for binding)
- 1 tbsp semolina (rava/sooji) OR oats flour (optional, helps bind)
- 1/4 tsp cumin seeds or powder
- 1/4 tsp grated ginger
- A pinch of turmeric
- Salt to taste
- Fresh coriander leaves, finely chopped (optional)
🔥 Instructions:
- Prep the mixture:
- In a mixing bowl, combine grated carrot, mashed peas, and mashed potato.
- Add semolina/oats flour, cumin, ginger, turmeric, and salt.
- Mix everything thoroughly. If the mix feels wet, add a little more oats or semolina.
- Shape the cutlets:
- Divide into equal parts and form into small round or oval patties.
- Keep them slightly thick so they remain moist when steamed.
- Steam the cutlets:
- Place them on a greased steamer plate or idli stand.
- Steam for 10–12 minutes on medium heat, until they feel firm and cooked.
- Cool slightly before serving:
- Let them rest 2–3 minutes after steaming to firm up.
✅ Optional Enhancements:
- Add boiled moong dal for extra protein.
- Serve with plain curd or mild coriander-mint chutney (no chili).
- If you can tolerate a bit of texture, coat lightly in roasted sooji before steaming for a crispier outer layer.
🩺 Why it’s perfect post-surgery:
- Zero oil
- Soft texture
- Rich in fiber, vitamins, and healing-friendly nutrients
- Easy to digest with minimal spices
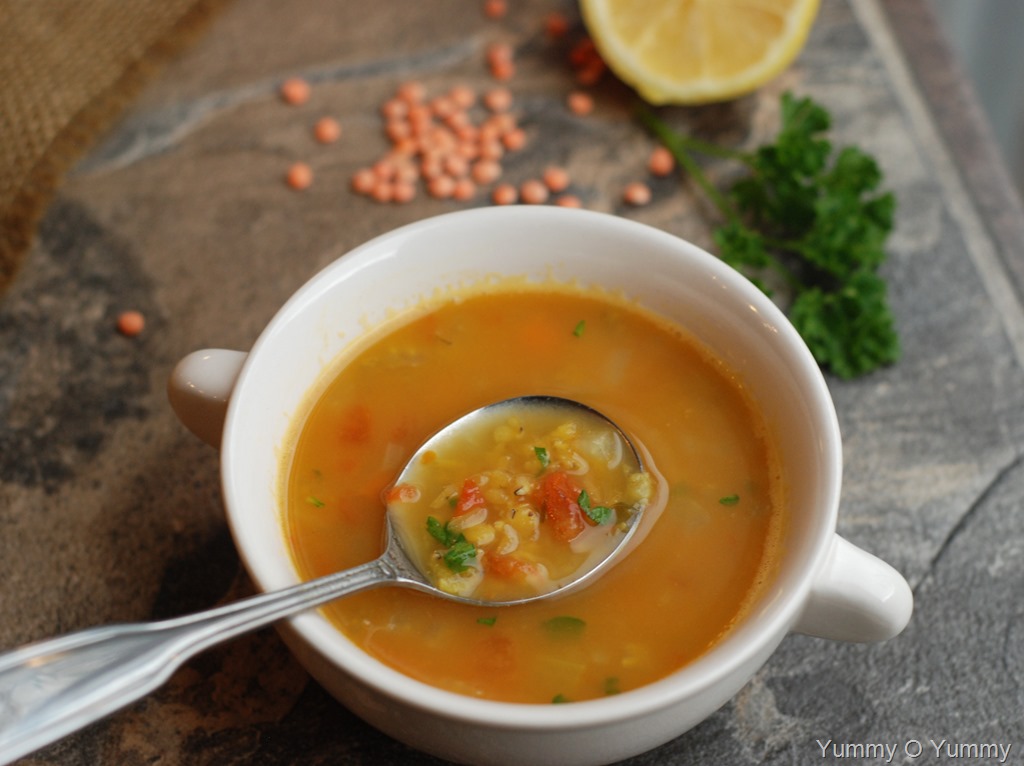
🥣 Masoor Dal Soup
✅ Serves: 2
⏱ Prep + Cook Time: 25–30 minutes
🥄 Texture: Smooth or slightly chunky (your choice)
🧄 Ingredients:
- 1/2 cup masoor dal (red lentils) – rinsed well
- 1 small tomato – chopped (optional, adds mild tang)
- 1 clove garlic – minced (optional, aids digestion)
- 1/4 tsp turmeric powder
- 1/2 tsp cumin seeds (jeera)
- A pinch of asafoetida (hing) – optional, helps with bloating
- 1 tsp ghee or very light oil
- Salt – to taste
- 2–3 cups water
- Fresh coriander (cilantro) – for garnish (optional)
🔥 Instructions:
- Pressure cook or boil the dal:
- In a pressure cooker or pot, add washed masoor dal, turmeric, tomato (if using), and 2 cups water.
- Cook until soft (2–3 whistles in a pressure cooker or ~20 minutes in a pot).
- Mash or blend:
- Once cooled, mash the dal with a spoon or blend it for a smooth texture (optional, depending on how soft you want it).
- Temper the soup:
- In a small pan, heat 1 tsp ghee.
- Add cumin seeds and let them crackle.
- Add garlic (if using) and sauté lightly until golden.
- Add a pinch of hing.
- Combine:
- Pour the tempering into the cooked dal.
- Add salt to taste.
- Adjust consistency with more water if needed.
- Simmer for 2–3 minutes to bring it all together.
- Serve:
- Garnish with a bit of fresh coriander (if desired).
- Serve warm — you can sip it like soup or pair it with soft rice or toast.
💡 Tips for Recovery:
- Add a few drops of lemon juice only if tolerated (after 1–2 weeks post-surgery).
- Skip chili entirely to keep it gut-friendly.
- You can add carrot or bottle gourd for extra nutrients if needed.
🥦 Healthy Indian Vegetable Dhokla Recipe
✳️ Ingredients:
- Besan (gram flour) – 1 cup (or you can use suji/semolina for variation)
- Grated carrots – 2 tbsp
- Grated bottle gourd (lauki) – 2 tbsp (very light on the stomach)
- Spinach (finely chopped) – optional, 1 tbsp
- Ginger paste – 1/2 tsp (optional based on digestion tolerance)
- Eno fruit salt – 1 tsp (for softness)
- Turmeric – a pinch
- Salt – as per doctor’s recommendation
- Water – enough to make a thick batter
🌿 Tempering (Optional and Light)
- 1 tsp oil (preferably olive or cold-pressed)
- Mustard seeds – 1/4 tsp
- Curry leaves – 3–4
- Asafoetida (hing) – a pinch (aids digestion)
👩🍳 How to Prepare:
- Make the batter: Mix besan, turmeric, salt, veggies, and water to a thick pouring consistency.
- Let it rest for 10–15 mins (optional).
- Add Eno just before steaming and mix gently.
- Pour into a greased steamer plate and steam for 12–15 minutes.
- Prepare light tempering (optional) and pour over steamed dhokla.
- Cut into small, soft pieces and serve warm.
🚫 Avoid/Limit:
- Green chilies, red chili powder (can irritate post-surgery stomach).
- Too much oil in tempering.
- Hard vegetables (like raw onions or raw cabbage) unless well cooked.
- Heavy accompaniments like spicy chutneys.
✅ Ideal Pairing:
- Homemade mint or coriander chutney (very mild, without chilies).
- Plain curd (yogurt) – if dairy is tolerated.
- Warm water or clear vegetable soup on the side.
🍳🥪 Besan Chilla Sandwich with Fresh Veggies
A fusion of crispy besan chilla, toasted bread, and crunchy Indian salad — perfect for breakfast, lunchbox, or chai-time snack!
🕒 Prep Time: 10 mins
🕒 Cook Time: 15 mins
🍽️ Serves: 2 (makes 2 sandwiches)
🌾 Ingredients
For the Besan Batter:
- 1 cup besan (gram flour)
- ¼ cup finely chopped onion
- 2 tbsp grated carrot (optional)
- 1 green chili, finely chopped (optional)
- 2 tbsp chopped coriander
- ½ tsp ajwain (carom seeds)
- ¼ tsp turmeric (haldi)
- ½ tsp red chili powder
- Salt to taste
- Water — enough to make a medium-thick, spreadable batter
For the Sandwich:
- 4 slices bread (any type)
- 1 small onion, thinly sliced
- 1 tomato, thinly sliced
- 1 cucumber, thinly sliced
- Salt & pepper to sprinkle
- Chaat masala (optional)
- Green chutney (optional)
- Ghee/oil for toasting
🔥 How to Make It
1️⃣ Make the Batter
- Mix all the batter ingredients in a bowl.
- Add water gradually to form a thick, spreadable batter (not runny).
2️⃣ Cook Bread Chilla Base (1 per sandwich)
- Heat a tawa on medium flame. Add a few drops of oil.
- Pour a ladle of besan batter on the tawa and spread it roughly to match the size of your bread slice.
- Quickly place a bread slice on top and press gently.
- Spread some more batter on top of the bread to coat it.
- Cook for 2–3 minutes until golden and crisp underneath.
- Flip the whole thing and cook the other side until crisp and cooked through.
- Repeat with the second slice to make a “top layer” for the sandwich.
Now you have 2 chilla-coated bread slices (one will be base, other top).
3️⃣ Assemble the Sandwich
- Take one cooked slice, chilla-side down.
- Spread a little green chutney (optional).
- Place sliced onions, tomatoes, cucumbers neatly on top.
- Sprinkle a little salt, pepper, and chaat masala.
- Cover with the second chilla-bread slice (chilla side up).
- Press gently and toast again on the tawa with a few drops of ghee for 1 minute (optional but delicious!).
✅ Serve It Hot!
- Cut in halves or triangles.
- Serve with:
- Mint chutney
- Ketchup
- Spiced curd dip
🌟 Tips & Variations:
- Add a slice of cheese on top of the veggies before closing for a melty touch.
- Can mix some paneer or boiled potato with the veggies for a heavier version.
- Great for lunchboxes — just wrap in foil or paper towel.