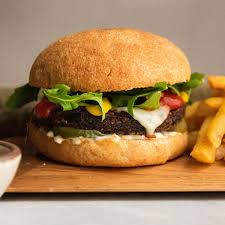
Breakfast Recipes

How to make Oats Cutlets

πŸ₯— Soft Oats Veg Cutlet

✳️ Ingredients:

  • Rolled oats or instant oats – 1 cup (dry roasted and powdered lightly)
  • Boiled potato – 1 medium (acts as a binder)
  • Carrot (grated & lightly steamed) – 2 tbsp
  • Bottle gourd (grated & squeezed) – 2 tbsp (optional, light on digestion)
  • Boiled peas or soft mashed beans – 2 tbsp (optional)
  • Coriander (finely chopped) – 1 tbsp (optional)
  • Salt – to taste (as per doctor’s guidance)
  • Cumin powder – 1/4 tsp (for mild flavor)
  • Turmeric – a pinch
  • Ginger paste – 1/2 tsp (optional and only if tolerated)

❗ Avoid green chilies, red chili powder, or garam masala post-surgery unless advised.


πŸ‘©β€πŸ³ How to Make:

  1. Roast oats lightly in a dry pan. Cool and grind coarsely.
  2. In a bowl, mix oats powder, mashed potato, veggies, and spices.
  3. Add a few spoons of water only if needed to bring everything together.
  4. Form small flat cutlets (avoid sharp edges for easier digestion).
  5. Pan-cook on a nonstick pan with just a few drops of olive oil or ghee until lightly golden on both sides.
    • Alternative: Air-fry or bake at 180Β°C (350Β°F) for 15–20 mins, flipping once.

βœ… Best Served With:

  • Low-fat curd/yogurt
  • Mild mint-coriander chutney (no green chili, garlic, or lemon)
  • Warm vegetable broth/soup on the side

🚫 Avoid:

  • Deep frying
  • Strong spices, garlic, or chili
  • Hard/raw salad pairings
  • Store-bought sauces or ketchup

🩺 Extra Recovery Tips:

  • Keep portions small and chew slowly.
  • Avoid this dish in the first few days post-surgery if you’re on a bland diet or soft/liquid-only plan.
  • Hydrate well, and balance your day with soft cooked dals, khichdi, or soups.

How to make Paneer Dhokla

πŸ§€πŸ₯ Paneer Dhokla (Steamed, Soft & Healing-Friendly)

βœ… Ideal for: Light breakfast, evening snack, or mini-meal


πŸ₯„ Ingredients:

For the dhokla base:

  • 1/2 cup besan (gram flour)
  • 2 tbsp crumbled paneer (fresh, soft, unsalted)
  • 1/4 cup curd (yogurt) – slightly sour is fine
  • 1/4 cup water (adjust as needed)
  • 1/4 tsp turmeric powder
  • Salt to taste
  • 1/2 tsp eno fruit salt (or 1/4 tsp baking soda)

Optional tempering (skip if avoiding oil):

  • 1 tsp oil or ghee
  • 1/2 tsp mustard seeds
  • 5–6 curry leaves
  • 1 tsp chopped coriander (optional)

πŸ‘©β€πŸ³ Instructions:

1. Prepare the batter:

  • In a mixing bowl, whisk together besan, curd, water, turmeric, and salt.
  • Add the crumbled paneer and mix well. The batter should be smooth and slightly thick β€” like idli batter.
  • Rest for 10 minutes (optional for fluffiness).

2. Add leavening:

  • Just before steaming, add Eno fruit salt and mix gently. The batter will rise immediately.

3. Steam:

  • Pour the batter into a greased dhokla plate or a small thali.
  • Steam for 12–15 minutes on medium heat.
  • Check with a toothpick β€” it should come out clean.

4. Cool and cut:

  • Let it cool for a few minutes, then cut into squares or diamonds.

5. Tempering (optional):

  • Heat 1 tsp oil or ghee. Add mustard seeds, let them splutter.
  • Add curry leaves, then pour this tempering over the dhokla.
  • Garnish with coriander if you like.

🩺 Why It’s Great for Recovery:

  • Steamed, not fried
  • Paneer adds protein for healing
  • Curd and besan aid digestion
  • Soft texture β€” easy to chew and digest
  • No chili, minimal oil β€” gut-friendly

βœ… Variations:

  • Add grated carrots or zucchini to the batter for extra nutrients
  • Skip tempering and serve plain with mint curd chutney (no chili)
  • Use low-fat paneer or even mashed tofu if preferred

How to make Shredded Chicken Dalia

πŸ—πŸŒΎ Shredded Chicken Dalia (Healing One-Pot Meal)

βœ… Great for: Light lunch/dinner, post-surgery diet


πŸ₯„ Ingredients:

  • 1/2 cup dalia (broken wheat/bulgar wheat) – washed and drained
  • 1/2 cup cooked, shredded boneless chicken
  • 1 small carrot, finely chopped
  • 1 small zucchini or bottle gourd (lauki), finely chopped (optional)
  • 1 tsp grated ginger
  • 1/4 tsp turmeric powder
  • 1/2 tsp cumin seeds
  • 1 tsp ghee or light oil
  • Salt, to taste
  • 3 cups water or light chicken broth
  • Optional: few curry leaves or coriander for flavor

πŸ”₯ Instructions:

  1. Cook the chicken (if not already):
    • Boil or pressure cook boneless chicken with a pinch of salt and turmeric.
    • Once cooked, shred it into small pieces using a fork.
  2. Prepare the base:
    • In a pressure cooker or thick-bottomed pot, heat ghee.
    • Add cumin seeds (and curry leaves if using), sautΓ© for a few seconds.
    • Add grated ginger and chopped veggies. SautΓ© lightly (don’t brown).
  3. Add dalia and cook:
    • Add washed dalia and turmeric. Stir for 1–2 mins.
    • Pour in 3 cups water or broth.
    • Add salt to taste.
  4. Pressure cook or simmer:
    • Pressure cooker: Cook for 2–3 whistles.
    • Open pot: Cover and simmer for ~25–30 minutes, stirring occasionally, until soft and porridge-like.
  5. Add shredded chicken:
    • Once dalia is cooked, stir in shredded chicken.
    • Simmer for 3–5 more minutes so flavors combine.
  6. Serve warm:
    • Add chopped coriander (optional) and serve warm as a complete meal.

🩺 Why This is Perfect Post-Surgery:

  • Dalia (broken wheat): Slow-digesting carbs, fiber, iron
  • Chicken: Lean protein, supports tissue repair
  • Veggies: Gentle vitamins & minerals
  • Mild spices: Help digestion without irritating the gut

How to make Coconut Rice

πŸ₯₯ Coconut Rice (Light, Indian Style, No Spice)


πŸ₯„ Ingredients:

  • 1 cup cooked rice (preferably short-grain or basmati)
  • 1/3 cup freshly grated coconut (or unsweetened desiccated coconut)
  • 1 tsp coconut oil (or regular ghee)
  • 1/2 tsp mustard seeds
  • 5–6 curry leaves (optional but aromatic)
  • 1 tsp urad dal (split black gram) – optional for texture
  • 1–2 tbsp chopped fresh coriander (optional)
  • Salt to taste
  • Optional: A pinch of asafoetida (hing) for digestion

πŸ”₯ Instructions:

  1. Prepare the rice:
    • Cook rice until soft but not mushy. Let it cool slightly so it doesn’t break when mixing.
  2. Prepare the tempering:
    • Heat coconut oil or ghee in a small pan.
    • Add mustard seeds and let them splutter.
    • Add curry leaves and urad dal (if using); sautΓ© until lightly golden.
    • (Optional: Add a pinch of hing for digestive aid.)
  3. Mix in coconut:
    • Lower the heat and add the grated coconut.
    • SautΓ© for 30–60 seconds just to warm it slightly (don’t brown it).
  4. Combine:
    • Add the tempering + coconut mix to the cooked rice.
    • Sprinkle salt to taste.
    • Gently mix everything to coat the rice evenly.
    • Garnish with fresh coriander if using.

πŸ₯£ Serving Suggestions:

  • Pair with plain curd, boiled moong dal, or mild vegetable stew.
  • For protein, add a few pieces of soft boiled egg or steamed chicken on the side.

βœ… Post-Surgery Benefits:

  • Coconut: Rich in healthy fats, aids healing, supports digestion.
  • Rice: Easily digestible carb for energy.
  • No chili, no onion, no heavy spices β€” perfect for recovery.

How to make Steamed Carrot and Pea Cutlets

πŸ₯•πŸŸ’ Steamed Carrot and Pea Cutlets (No Fry)

πŸ§‘β€πŸ³ Cooking Method: Steaming (no frying)


πŸ₯„ Ingredients:

  • 1 cup grated carrot
  • 1/2 cup boiled green peas (lightly mashed)
  • 1 small boiled potato (for binding)
  • 1 tbsp semolina (rava/sooji) OR oats flour (optional, helps bind)
  • 1/4 tsp cumin seeds or powder
  • 1/4 tsp grated ginger
  • A pinch of turmeric
  • Salt to taste
  • Fresh coriander leaves, finely chopped (optional)

πŸ”₯ Instructions:

  1. Prep the mixture:
    • In a mixing bowl, combine grated carrot, mashed peas, and mashed potato.
    • Add semolina/oats flour, cumin, ginger, turmeric, and salt.
    • Mix everything thoroughly. If the mix feels wet, add a little more oats or semolina.
  2. Shape the cutlets:
    • Divide into equal parts and form into small round or oval patties.
    • Keep them slightly thick so they remain moist when steamed.
  3. Steam the cutlets:
    • Place them on a greased steamer plate or idli stand.
    • Steam for 10–12 minutes on medium heat, until they feel firm and cooked.
  4. Cool slightly before serving:
    • Let them rest 2–3 minutes after steaming to firm up.

βœ… Optional Enhancements:

  • Add boiled moong dal for extra protein.
  • Serve with plain curd or mild coriander-mint chutney (no chili).
  • If you can tolerate a bit of texture, coat lightly in roasted sooji before steaming for a crispier outer layer.

🩺 Why it’s perfect post-surgery:

  • Zero oil
  • Soft texture
  • Rich in fiber, vitamins, and healing-friendly nutrients
  • Easy to digest with minimal spices

How to make Masoor Dal Soup

πŸ₯£ Masoor Dal Soup

βœ… Serves: 2

⏱ Prep + Cook Time: 25–30 minutes

πŸ₯„ Texture: Smooth or slightly chunky (your choice)


πŸ§„ Ingredients:

  • 1/2 cup masoor dal (red lentils) – rinsed well
  • 1 small tomato – chopped (optional, adds mild tang)
  • 1 clove garlic – minced (optional, aids digestion)
  • 1/4 tsp turmeric powder
  • 1/2 tsp cumin seeds (jeera)
  • A pinch of asafoetida (hing) – optional, helps with bloating
  • 1 tsp ghee or very light oil
  • Salt – to taste
  • 2–3 cups water
  • Fresh coriander (cilantro) – for garnish (optional)

πŸ”₯ Instructions:

  1. Pressure cook or boil the dal:
    • In a pressure cooker or pot, add washed masoor dal, turmeric, tomato (if using), and 2 cups water.
    • Cook until soft (2–3 whistles in a pressure cooker or ~20 minutes in a pot).
  2. Mash or blend:
    • Once cooled, mash the dal with a spoon or blend it for a smooth texture (optional, depending on how soft you want it).
  3. Temper the soup:
    • In a small pan, heat 1 tsp ghee.
    • Add cumin seeds and let them crackle.
    • Add garlic (if using) and sautΓ© lightly until golden.
    • Add a pinch of hing.
  4. Combine:
    • Pour the tempering into the cooked dal.
    • Add salt to taste.
    • Adjust consistency with more water if needed.
    • Simmer for 2–3 minutes to bring it all together.
  5. Serve:
    • Garnish with a bit of fresh coriander (if desired).
    • Serve warm β€” you can sip it like soup or pair it with soft rice or toast.

πŸ’‘ Tips for Recovery:

  • Add a few drops of lemon juice only if tolerated (after 1–2 weeks post-surgery).
  • Skip chili entirely to keep it gut-friendly.
  • You can add carrot or bottle gourd for extra nutrients if needed.

How to make Vegetable Dhokla

πŸ₯¦ Healthy Indian Vegetable Dhokla Recipe

✳️ Ingredients:

  • Besan (gram flour) – 1 cup (or you can use suji/semolina for variation)
  • Grated carrots – 2 tbsp
  • Grated bottle gourd (lauki) – 2 tbsp (very light on the stomach)
  • Spinach (finely chopped) – optional, 1 tbsp
  • Ginger paste – 1/2 tsp (optional based on digestion tolerance)
  • Eno fruit salt – 1 tsp (for softness)
  • Turmeric – a pinch
  • Salt – as per doctor’s recommendation
  • Water – enough to make a thick batter

🌿 Tempering (Optional and Light)

  • 1 tsp oil (preferably olive or cold-pressed)
  • Mustard seeds – 1/4 tsp
  • Curry leaves – 3–4
  • Asafoetida (hing) – a pinch (aids digestion)

πŸ‘©β€πŸ³ How to Prepare:

  1. Make the batter: Mix besan, turmeric, salt, veggies, and water to a thick pouring consistency.
  2. Let it rest for 10–15 mins (optional).
  3. Add Eno just before steaming and mix gently.
  4. Pour into a greased steamer plate and steam for 12–15 minutes.
  5. Prepare light tempering (optional) and pour over steamed dhokla.
  6. Cut into small, soft pieces and serve warm.

🚫 Avoid/Limit:

  • Green chilies, red chili powder (can irritate post-surgery stomach).
  • Too much oil in tempering.
  • Hard vegetables (like raw onions or raw cabbage) unless well cooked.
  • Heavy accompaniments like spicy chutneys.

βœ… Ideal Pairing:

  • Homemade mint or coriander chutney (very mild, without chilies).
  • Plain curd (yogurt) – if dairy is tolerated.
  • Warm water or clear vegetable soup on the side.

How to make Besan Chilla Sandwich

🍳πŸ₯ͺ Besan Chilla Sandwich with Fresh Veggies

A fusion of crispy besan chilla, toasted bread, and crunchy Indian salad β€” perfect for breakfast, lunchbox, or chai-time snack!


πŸ•’ Prep Time: 10 mins

πŸ•’ Cook Time: 15 mins
🍽️ Serves: 2 (makes 2 sandwiches)


🌾 Ingredients

For the Besan Batter:

  • 1 cup besan (gram flour)
  • ΒΌ cup finely chopped onion
  • 2 tbsp grated carrot (optional)
  • 1 green chili, finely chopped (optional)
  • 2 tbsp chopped coriander
  • Β½ tsp ajwain (carom seeds)
  • ΒΌ tsp turmeric (haldi)
  • Β½ tsp red chili powder
  • Salt to taste
  • Water β€” enough to make a medium-thick, spreadable batter

For the Sandwich:

  • 4 slices bread (any type)
  • 1 small onion, thinly sliced
  • 1 tomato, thinly sliced
  • 1 cucumber, thinly sliced
  • Salt & pepper to sprinkle
  • Chaat masala (optional)
  • Green chutney (optional)
  • Ghee/oil for toasting

πŸ”₯ How to Make It

1️⃣ Make the Batter

  • Mix all the batter ingredients in a bowl.
  • Add water gradually to form a thick, spreadable batter (not runny).

2️⃣ Cook Bread Chilla Base (1 per sandwich)

  1. Heat a tawa on medium flame. Add a few drops of oil.
  2. Pour a ladle of besan batter on the tawa and spread it roughly to match the size of your bread slice.
  3. Quickly place a bread slice on top and press gently.
  4. Spread some more batter on top of the bread to coat it.
  5. Cook for 2–3 minutes until golden and crisp underneath.
  6. Flip the whole thing and cook the other side until crisp and cooked through.
  7. Repeat with the second slice to make a “top layer” for the sandwich.

Now you have 2 chilla-coated bread slices (one will be base, other top).

3️⃣ Assemble the Sandwich

  1. Take one cooked slice, chilla-side down.
  2. Spread a little green chutney (optional).
  3. Place sliced onions, tomatoes, cucumbers neatly on top.
  4. Sprinkle a little salt, pepper, and chaat masala.
  5. Cover with the second chilla-bread slice (chilla side up).
  6. Press gently and toast again on the tawa with a few drops of ghee for 1 minute (optional but delicious!).

βœ… Serve It Hot!

  • Cut in halves or triangles.
  • Serve with:
    • Mint chutney
    • Ketchup
    • Spiced curd dip

🌟 Tips & Variations:

  • Add a slice of cheese on top of the veggies before closing for a melty touch.
  • Can mix some paneer or boiled potato with the veggies for a heavier version.
  • Great for lunchboxes β€” just wrap in foil or paper towel.

How to make Chickpea Avocado Toast

πŸ₯‘πŸŒΆοΈ Healthy Indian-Style Chickpea Avocado Toast

βœ… Ingredients (for 2 slices):

  • 2 slices whole grain or multigrain bread (or millet bread for gluten-free)
  • 1 ripe avocado
  • 1/2 cup cooked chickpeas (or canned, rinsed)
  • 1–2 tsp olive oil or cold-pressed mustard oil
  • 1/4 tsp cumin powder (jeera)
  • 1/4 tsp chaat masala (optional but tasty!)
  • 1/2 green chili (finely chopped, adjust to taste)
  • 1 tbsp finely chopped red onion
  • 1 small tomato, finely chopped (seeds removed)
  • 1 tbsp chopped fresh coriander (dhaniya)
  • Juice of 1/2 lime or lemon
  • Salt to taste
  • Optional toppings: chili flakes, sesame seeds, or roasted peanuts

πŸ‘©πŸ½β€πŸ³ Instructions:

  1. Toast the Bread:
    • Toast the slices of bread until golden and crisp.
  2. Prepare the Chickpea-Avocado Mash:
    • In a bowl, mash the avocado and chickpeas together (leave a bit chunky for texture).
    • Add cumin, salt, chaat masala, chopped green chili, onion, tomato, and coriander.
    • Drizzle in olive oil and squeeze in the lime juice.
    • Mix well to combine into a flavorful mash.
  3. Assemble the Toast:
    • Spread the mixture generously onto the toasted bread slices.
    • Sprinkle with optional toppings like sesame seeds, chili flakes, or roasted peanuts for crunch.
  4. Serve Immediately:
    • Best enjoyed fresh while the toast is crisp!

🧠 Health Notes:

  • Chickpeas = Plant protein + fiber
  • Avocado = Healthy fats + potassium
  • Spices = Anti-inflammatory and digestion-supportive

How to make Apple Nachos

🍏 Indian-Style Apple Nachos (Healthy & Flavorful)

βœ… Ingredients:

  • 2 crisp apples (Fuji, Gala, or Shimla variety)
  • 1–2 tbsp jaggery syrup, date syrup, or honey
  • 1–2 tbsp unsweetened peanut butter or almond butter (or tahini if preferred)
  • 1/4 tsp ground cardamom (elaichi)
  • 1 tbsp roasted chopped peanuts or pistachios
  • 1 tbsp unsweetened shredded coconut
  • 1 tbsp granola or murmura (puffed rice) for crunch
  • Optional: A pinch of chaat masala or cinnamon
  • A few drops of rose water or saffron milk (optional for a royal touch)
  • Lemon juice (to prevent browning)

πŸ‘©πŸ½β€πŸ³ Instructions:

  1. Slice Apples:
    • Wash, core, and slice apples into thin wedges or rounds.
    • Toss with lemon juice to keep them fresh and white.
    • Arrange them on a large plate like nachos.
  2. Warm Drizzles:
    • Slightly warm the peanut butter and jaggery or date syrup so they’re easy to drizzle.
  3. Flavor Boost:
    • Stir cardamom into the syrup or nut butter for that Indian mithai vibe.
    • Add a couple drops of rose water or saffron milk if using.
  4. Assemble the Apple Nachos:
    • Drizzle the nut butter and syrup over the apple slices.
    • Sprinkle chopped nuts, coconut, and granola or puffed rice on top.
    • Light dusting of chaat masala or cinnamon to finish.
  5. Serve Immediately:
    • Enjoy it fresh for best texture and flavor.

🌿 Optional Add-ins:

  • Chopped dried fruits: like dates, figs, or raisins.
  • Homemade trail mix: mix of sunflower seeds, melon seeds, and fennel seeds (saunf).
  • Yogurt drizzle: for a creamy layer, use thick hung curd or Greek yogurt with a bit of honey and cardamom.