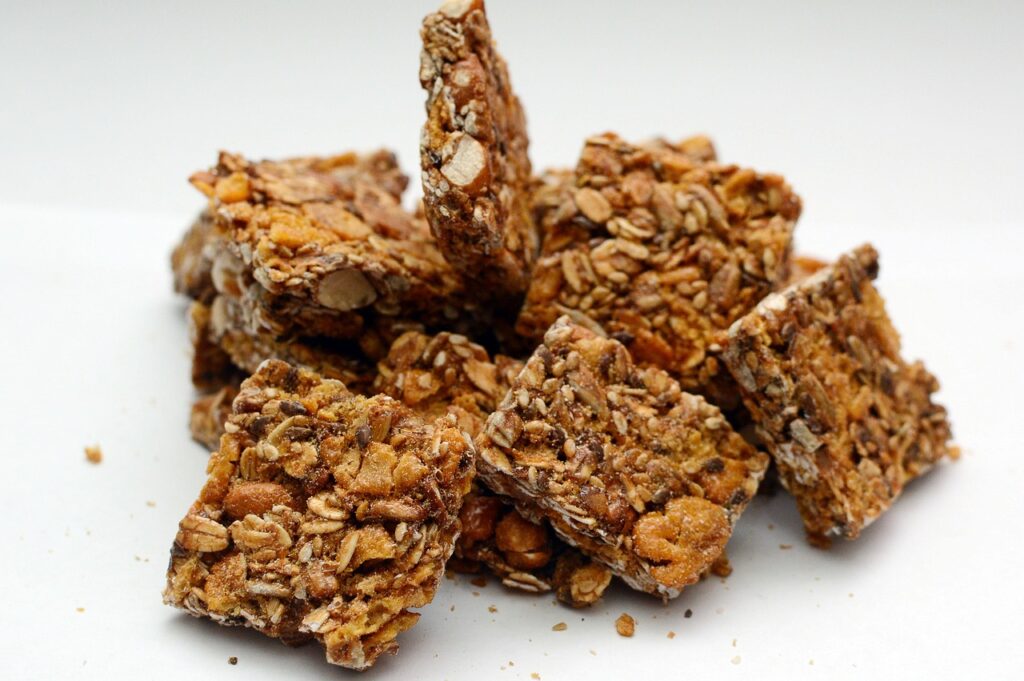
Raj Kumari

EGG UTTAPAM

Egg Uttapam is a popular South Indian dish made with a batter of fermented rice and lentils, topped with a fluffy egg omelette. This dish is gluten-free and an excellent source of protein and carbohydrates. However, people with an egg allergy should avoid this dish.

INGRREDIENTS:

For the Uttapam Batter: – 1 cup idli rice: 200gms – 1/2 cup urad dal (split and dehusked black gram): 100gms – 1/2 tsp fenugreek seeds: 2gms – Salt to taste – Water as needed

For the Egg Topping:

– 2 eggs: 100gms – 1 onion, chopped: 80gms – 1 green chili, chopped: 5gms – Salt to taste – 1 tbsp oil: 15ml

PREPRATION

Preparation: 1. Soak the idli rice and urad dal separately for at least 4 hours. Soak fenugreek seeds with urad dal.

2. Grind the urad dal with fenugreek seeds into a smooth batter. Transfer to a large bowl.

3. Grind the idli rice into a slightly coarse batter and add it to the bowl with the urad dal batter. Mix well.

4. Add salt to taste and enough water to make a thick batter. Mix well and let it ferment overnight or for at least 8 hours.

5. Heat a griddle or tawa over medium heat. Grease it with oil.

6. Pour a ladleful of the fermented batter on the griddle and spread it into a circle.

7. Sprinkle chopped onions and green chili on top of the batter.

8. Beat the eggs in a bowl and pour it over the uttapam.

9. Sprinkle salt over the eggs and drizzle some oil around the edges of the uttapam.

10. Cover the uttapam with a lid and let it cook for 2-3 minutes until the eggs are set and the bottom of the uttapam is golden brown.

11. Flip the uttapam and cook for another 1-2 minutes until the other side is golden brown.

12. Serve hot with coconut chutney and sambar.

Nutritional value per 100 grams:

Calories: 130kcal

Carbs: 20gms

Fiber: 1.5gms

Proteins: 5gms

Fat: 3gms

How to make soya paneer pancake

Soya Paneer Pancake is a healthy and nutritious pancake recipe made with soy flour, paneer, and a blend of aromatic spices. This recipe is gluten-free and vegetarian, making it suitable for many dietary preferences. It is also a great source of protein and fiber, thanks to the soy flour and paneer. However, people with a dairy or soy allergy should avoid this dish.

INGREDIENTS

1 cup soya flour: 120gms – 1/2 cup paneer, crumbled: 50gms – 1/2 teaspoon cumin powder: 2.5gms – 1/2 teaspoon coriander powder: 2.5gms – 1/4 teaspoon red chili powder: 1.25gms – Salt to taste – Water, as needed: 100ml – Oil, for cooking: 10ml

PREPERATION

1. In a large mixing bowl, combine the soya flour, crumbled paneer, cumin powder, coriander powder, red chili powder, and salt.

2. Add enough water to make a smooth batter. The batter should be of pouring consistency.

3. Heat a non-stick pan or griddle over medium heat. Brush some oil on the pan.

4. Pour a ladleful of the batter onto the hot pan and spread it into a circle.

5. Cook for 2-3 minutes until the bottom is golden brown. Flip the pancake and cook the other side for 1-2 minutes.

6. Remove the pancake from the pan and repeat the process with the remaining batter.

7. Serve hot with chutney or sauce of your choice.

NUTRITIONAL VALUE PER SERVING: –

  • Calories: 140 kcal
  • – Protein: 10g
  • – Fat: 6g
  • – Carbohydrates: 10g
  • – Fiber: 4g

HOW TO PREPARE GOLDEN MILK KEFIR

Kefir golden milk blends the probiotic richness of kefir with the warming, anti-inflammatory properties of turmeric. This nutritious beverage is often made by combining kefir with turmeric, ginger, honey, and spices, creating a creamy, vibrant drink celebrated for its potential health benefits and deliciously unique flavor profile.

INGREDIENTS FOR GOLDEN MILK KEFIR :

  • 1 cup of fermented milk kefir
  •  1/2 tablespoon coconut oil
  • 1/2 tablespoon raw honey
  • 1/2 teaspoon of the prepared turmeric paste (1/4 cup water, 1/16 cup extra virgin coconut oil; 1/8 cup Golden Milk blend or make your own blend using 1/8 cup turmeric powder; 1/4 teaspoon ground black pepper)

INSTRUCTIONS GOLDEN MILK KEFIR :

Prepare the turmeric paste:

  • In a pan, combine the Golden Milk blend or turmeric and water. Heat gently and whisk until it thickens to a paste (approximately 5-10 minutes).
  • Once thickened, add the ground black pepper and coconut oil. Stir continuously to ensure all ingredients are mixed properly.
  • Allow the paste to cool and then store it in the refrigerator for up to 3 weeks.

Make the golden kefir:

  • In a blender, combine 1/2 teaspoon of the prepared Golden Milk or turmeric paste with fermented milk kefir, coconut oil, and honey.
  • Blend until smooth and well combined.
  • Transfer the golden milk kefir to a storage container and store it in the refrigerator for 1-2 weeks.

Golden milk kefir contains approximately:-

Calories: 202

Protein: 10g

Carbohydrates: 20.5g

Fat: 10g

For more recipes: Click herehttps://fitpiq.com/how-to-prepare-sourdough-bread-at-home/

If you are facing issues in dropping your weight, please take this free-body type assessment: Click herehttps://fitpiq.com/wp-admin/post.php?post=10376&action=edit

How To Prepare Drumstick Soup

The drumstick soup recipe is full of essential nutrients, and low-calorie and carbohydrate drumsticks help regulate blood sugar levels, control hypertension, and boost vitality. Butter added to the soup provides the needed energy, and milk helps to strengthen the bones. Drumstick is probably one such vegetable that is loaded with vitamins and is also very healthy. Drumsticks, also known as moringa, are indeed an excellent addition to any diet. The most popular way to consume drumsticks is with meals, but there are plenty of other ways you can incorporate them into your diet and reap their benefits. Drumsticks are highly nutritious, not only for their protein content; they are also packed with beta-carotene, vitamin C, calcium, potassium, and iron. Make sure to chew the leaves well to assimilate the maximum amount of nutrients. Now let’s get to the drumstick soup recipe.

Drumstick Soup Benefits

1. Protecting and nourishing skin and hair

2. Treating edema

3. Preventing and treating cancer

4. Treating stomach complaints

5. Fighting against bacterial diseases

6. Protecting the liver

7. Making bones healthier

8. Treating asthma

9. Protecting against kidney disorders

10. Treating diabetes

11. Improving eye health

Ingredients –

  • 4 – 5 Fresh drumsticks
  • 1 Small size onion, chopped
  • 5 – 6 Garlic cloves
  • 1 Bay leaf
  • 1 Teaspoon black peppercorns
  • 1/4 Cup coriander stalks
  • 1 1/4 Teaspoon rock salt
  • 3 Cup water

Recipe For Drumstick Soup –

  • To prepare the drumstick soup, wash it gently and lightly Peel the drumsticks. Therefor place them on a chalkboard and cut them to approximately 2 inches.
  • Now take some onions, cloves of garlic, and coriander stalks, wash them, and peel and chop them into pieces.
  • Put all the ingredients in a pressure cooker: drumsticks, onions, garlic, bay leaf, coriander stalks, peppercorns, and salt. After that, at last, add water to the pressure cooker and close the lid by allowing for 1-2 whistles.
  • Add water to the pressure cooker and close the lid
  • Allow the steam to escape before opening the lid. Otherwise, it will spill out if you try to open it immediately, so you need to take precautions.
  • Once the mixture cools, lightly transfer it to a mixer or blender and blend until it has a smooth texture.
  • Place the strainer over a bowl and pass the blender mixture through it using a round spoon so you can get a smooth maximum yield.
  • 9. Transfer in a serving bowl, Serve hot, garnished with the remaining seeds of drumsticks, chopped coriander and sprinkle crushed black peppercorns.
  • Serve hot, garnished with the remaining seeds of drumsticks, chopped coriander and sprinkle crushed black peppercorns.

Macros –

  • Calories: 50 kcal
  • Protein: 3.4 grams
  • Carbohydrates: 11 grams
  • Fat:  0.4 grams

For more recipes: Click herehttps://fitpiq.com/how-to-prepare-sourdough-bread-at-home/

If you are facing issues in dropping your weight, please take this free-body type assessment: Click here

How to Prepare Sourdough Bread at home

Sourdough bread is not only tastier than regular bread, but it is also healthier and simpler to digest. This healthier sourdough bread with 100% sprouted whole grain flour is packed with seeds for extra vitamins, minerals, protein, and healthy fats. Because of the incorporated superfoods, this bread is one of the most nutrient-dense on the market. It’s also quite yummy. This bread is robust, has a delicious nutty flavor, and has great texture with all of those seeds. This recipe is ridiculously simple and vegan!

Sourdough is known for its characteristic tangy flavor, chewy texture and crisp, crackly crust. From a health standpoint, it dominates when compared to supermarket loaves. The naturally occurring acids and long fermentation help to break down the gluten, making it more digestible and easy for the body to absorb. And it tastes darn good!

Ingredients For Sourdough Bread at home-

Himalayan pink salt -2 tsp

Room temperature water 1 ¾ cups

Unfed starter from fridge 2 Tbs

Sunflower seeds – ¼ cup

Pumpkin seeds – ¼ cup

Black sesame seeds – ¼ cup

Hemp seeds – ¼ cup

Ground flaxseed – ¼ cup

Recipe For Sourdough Bread at home –

Method Mix all ingredients mentioned under dry mix thoroughly.

Add warm water, slowly kneading continuously until soft for about 10 minutes. Cover and allow to rise for an hour until doubled in size. Punch and kneel again.

Grease a loaf pan with butter, shape the dough into a loaf, and place it in it.

Simultaneously, for any remaining dough, sprinkle with topping.

Bake for 1 hour at 400°F until the top crust turns golden brown. Cool and remove. Slice them and enjoy every bite loaded with nutrients.

Macros – 1 Slice

  • Calories: 92 kcal
  • Protein: 3.8 grams
  • Carbohydrates: 18 grams
  • Fat:  0.6 grams

For more recipes: Click here

If you are facing issues in dropping your weight, please take this free-body type assessment: Click here

3 Fold Tortilla Quinoa & Red Lentil Wrap

The 3-fold tortilla quinoa and red lentil wrap is not only easy to make but also gluten-free, packed with protein, and super-versatile.

INGREDIENTS

  • ½ Cups (90 g) Red Lentils
  • ½ Cups (100 g) Quinoa
  • 1 ½ Cups of Water
  • ½ Tsp. Salt
  • Oil as Per Requirement
  • Chopped Veggies
  • Crushed Paneer
  • Mozzarella Cheese

METHODS

FOR TOTILLA

  • Raw red lentils and raw quinoa should be soaked in water overnight, ideally in the refrigerator.
  • After thoroughly rinsing and straining,
  • Transfer the mixture into the blender, add water and salt, and blend until it has a smooth and fine texture.
  • Collect the batter in a bowl and keep it aside for a while.
  • Heat a hot nonstick pan and lightly brush it with some oil.
  • Pour approximately 1/3 cup of the runny batter.
  • Cook for 1 to 2 minutes on each side, just like a crepe, but turn each side twice or more until you achieve the desired flatbread or tortilla consistency or texture.

FOR STUFFING

  • Take all the chopped vegetables and paneer together to make a filling, adding salt and spices as per taste. Mix it well and keep it aside.
  • Take a tortilla wrap Add some fillings with the help of a spoon and spread them on a 1/4-inch portion of the tortilla wrap.
  • After adding fillings to the wrap, cut the radius of the wrap from the center of the tortilla, and then fold the wrap wisely until the 4th fold.
  • Now bake it on a heated pan or fry pan till you get the golden texture of the wrap.
  • After the final touch, serve it with or without green chutney or sauce.

MACROS (1-flatbread or tortilla)

  • Energy: 99 calories
  • Protein: 5.1 g
  • Fat: 1.15 g
  • Carbohydrates: 17.28 g

If you are struggling shedding weight. You can talk to us by taking this assessment: Click here

For more information click here.https://fitpiq.com/vegetable-soup/

HOW TO PREPARE VEGETABLE SOUP

The vegetable soup is easy, healthy, and delicious. Indian vegetable soup is super quick to make. It just takes 20 minutes from start to finish to make a large pot of flavorful and hearty soup. The vegetable soup can be made with any vegetables of your choice. The taste and flavor of the soup depend on the vegetables and spices used, so make the right choices.

The vegetable soup is made almost every day in the winter, and it is so damn healthy and comforting! It is a bit mild taste-wise, so you can always add more pepper or chili flakes for that kick.
Also, you can add croutons too! So go give this one a try and thank me later.

INGREDIENTS FOR VEGETABLE SOUP

  • Chopped Onion – 1
  • Carrot – 1/2
  • Lots of French Bean
  • Some Broccoli
  • Beetroot – 1/2
  • Garlic Clove 2-3
  • Ginger -1/2 Inch
  • Lots of Drumstick
  • Salt as per taste
  • Ghee 1 Teaspoon
  • Water 2- 2½ – Cups
  • 1/4 – Teaspoon black pepper powder

METHOD FOR VEGETABLE SOUP

  • Wash and peel carrots, drumsticks, and beetroot, and cut into equal pieces.
  • Take ginger and garlic clove.
  • Take green bean, onion and broccoli cut them into medium size pieces.
  • Add all the ingredient in to the cooker.
  • Now add 2 and 2½ glass of water in a pressure cooker and ½ tsp salt and ghee.
  • Pressure cook it until 2 whistles.
  • After completing the cooking time let it cool completely.
  • Collect and grind cooked vegetables with the help of a hand blender. Don’t blend it too much. Just slightly is good.
  • Strain the mixture using a strainer. Separate the pulp nicely. Add little water and separate the pulp as much as possible.
  • After straining the pulp and adding tadka to the vegetable soup, heat some oil in the kadhai and sprinkle garlic cloves.
  • Transfer the drumsticks stock to a pan and bring this stock to a boil.
  • Healthy vegetable soup is ready to serve.

MACROS (1 BOWL SOUP)

Protein : 3.8g

Fat : 3.6g

Carbohydrate : 16.6g

Calories : 111kcal

If you are struggling shedding weight. You can talk to us by taking this assessment: Click here

For more information click here.

HOW TO PREPARE GOLDEN MILK

WINTER IMMUNITY GOLDEN MILK

Golden milk is a healthy and healing drink! Golden milk also know as Anti-Inflammatory Turmeric Tea. Also it’s super delicious. Turmeric mixed with warm milk and a range of condiments is a tried-and-tested homemade remedy for coughs and colds in Indian households. Curcumin, turmeric’s most significant compound, has medicinal properties and is used to reduce JOINT PAIN, ARTRITIS, and INFLAMMATION, and has even been used to treat DEPRESSION. Add all the spices to the warm milk, not to the hot milk. Golden milk can be enjoyed before bedtime for its potential calming properties or as a warming and comforting beverage during the day. It’s important to note that turmeric has a strong flavor, so feel free to adjust the spices and sweetener to suit your taste preferences.

INGREDIENTS FOR PREPARE GOLDEN MILK

  • Whole Milk – 1 Glass (or plant-based like almond, soy, or coconut)
  • Turmeric powder – 1/2 Tea spoon(or use fresh turmeric, grated)
  • Cinnamon powder – 1/4 Table spoon
  • Black pepper – 1-2 Pinch
  • Ginger Powder – 1/2 Table spoon
  • Nutmeg Powder – 1/2 Table spoon
  • Cardamom Powder – 1/2 Table spoon
  • Kharik Powder(Dry Dates Powder) – 1/2 Table spoon
  • Almond Powder – 1 Table spoon

PREPARATION FOR PREPARE GOLDEN MILK

  • 1: Heat a pan over medium heat and add milk. Add the turmeric powder to the milk after it has been lukewarm for a minute or two.
  • Next, include turmeric powder, ginger powder, black pepper powder, cinnamon powder, crushed green cardamom pods, and a cinnamon powder, Nutmeg powder, kharik powder and almond powder at last.
  • After whisking everything together, boil it gently for ten minutes. It should be nice and heated all the way through; boiling is not necessary.
  • Remove pan from heat, cover pan with a plate or lid and let it sit for another 5 minutes for the flavors to steep in. Strain the golden milk using a strainer into serving cups.
  • Serve warm! You may sprinkle with cardamom or before serving.
  • This great-tasting golden milk is your best natural defense to stay completely clear of flu, cough, and cold, so you can cast yourself with gay abandon into all the wonderful celebrations of the season.

MACROS (1 CUP)

Protein – 8 gm

Carbohydrate – 18.5gm

Fat – 9.9gm

Calories – 193kcal

For more recipes:https://fitpiq.com/how-to-make-keto-vegetable-salad/

If you are facing issues in dropping your weight, please take this free-body type assessment: Click here

HOW TO BAKE LOW GLYCEMIC INDEX BREAD(WITHOUT EGG)

TO BAKE LOW GLYCEMIC INDEX BREAD(WITHOUT EGG) ; The low-glycemic index bread without eggs has an effect on blood sugar levels, and this form of bread is known as low-glycemic index bread without eggs. The low-glycemic index bread without eggs just takes 30 to 45 minutes But processed bread has a higher glycemic index than the other breads that contain carbohydrates. However, there are differences in bread types. Whole-grain breads are generally lower on the glycemic index and higher in minerals and fiber.

  • Blood sugar levels: People with diabetes or those trying to avoid blood sugar spikes can benefit greatly from low-glycemic bread, which helps to keep blood sugar levels consistent. It avoids blood sugar spikes and crashes by slowing down the digesting process, which results in more even energy levels throughout the day.
  • Nutritional value: This low-glycemic bread may contain wholesome ingredients like seeds, nuts, or lentils.
  • Digestive well-being: Low-glycemic bread’s high fiber content helps to maintain a healthy digestive system and ward off constipation.
  • Weight control: Eating bread with a low glycemic index can help maintain a healthy body weight. Its increased fiber content and slower rate of digestion make you feel satisfied for longer, which lowers the chance of overeating and encourages more control over your appetite.

INGREDIENTS TO BAKE LOW GLYCEMIC INDEX BREAD(WITHOUT EGG)

  • Almond Flour : 1/2 Cup
  • Ground Flax Powder : 1/4 Cup
  • Coconut Flour : 1 Cup
  • Psyllium Husk : 1/3 Cup
  • Chia Seeds : 2 Teaspoon
  • Baking powder : 1 Teaspoon
  • Salt : 1/2 Teaspoon
  • Olive Oil : 2 Tablespoon
  • Apple Cider Vinegar : 2 Tablespoon
  • Lukewarm Water : 2 ¼ Cups

METHOD TO BAKE LOW GLYCEMIC INDEX BREAD(WITHOUT EGG)

  • Firstly turn the oven on to 350°F (180°C); fan mode is more efficient and quicker or bake using the standard mode.
  • Measure all your ingredients carefully in grams and mix all the dry ingredients together in a large mixing bowl and add apple cider vinegar and lukewarm water (cold water won’t activate the fiber in the flour, and the ingredients won’t bind)
  • Mix initially with a spoon. As you proceed, it will become less liquid. The dough is moist, and work the dough with your hands, pressing and squeezing it until a ball is formed. Therefore, we will get final product.
  • To allow the fiber to absorb all the water and keep the ingredients together, form a ball of dough and place it on the worktop for ten minutes.
  • Now Roll into a bread loaf form. Avoid pressing the dough too firmly and Line the prepared loaf pan with parchment paper and place the bread there.
  • If there are cracks in the top, you can repair them by moistening your fingertips with water and rubbing the bread’s surface. Optionally garnish with 1 tablespoon of sesame or poppy seeds.
  • For 45 minutes, bake on the lowest rack in the oven. On the other hand, bake for an additional 15 minutes on the middle rack. If the loaf begins to turn brown, you can cover it with a sheet of foil.
  • To test the bread’s texture, stick a skewer in the center. It should come out mostly or entirely free of crumbs.
  • After that take it out of the oven and let it cool for an hours on a rack and hence low-glycemic index bread is ready.
  • At Last serve directly as sandwich bread topped with cheese, butter, avocado, spinach, lettuce, or chicken.

MACROS (1 SLICE OF BREAD)

Protein : 2.6g

Fat : 2.1g

Carbohydrate : 3.6g

Calories : 68kcal

If you are struggling shedding weight. You can talk to us by taking this assessment: Click here

For more information click here.

CAULIFLOWER RICE

Cauliflower rice is the ideal quick and light side dish, and no one misses the carbs! You can serve this vegetarian rice with any protein you choose—chicken, shrimp, whatever—and call it dinner. You can cook it in a skillet or wok, or roast it on a sheet pan in the oven. The oven version is excellent and nutty; the skillet version is speedier and has a texture similar to rice. They’re both delicious. Variations on Cooked Cauliflower Rice Finish with fresh lemon juice and herbs. At the end, add the lime juice and garlic. In place of salt and pepper, substitute your favorite spices. To give it an Asian flavor, add soy sauce. It’s really simple to make riced cauliflower taste wonderful. It has a neutral flavor, so you can season it with other ingredients to vary how it tastes. As previously stated, the simplest method is to sauté it with a little onion and garlic. You can also use it in any dish that calls for cauliflower rice. Here are some of my favorite recipes that use cauliflower instead of rice. Cooked cauliflower rice  or raw riced cauliflower rice can be stored in the refrigerator for up to 4 days and used in other recipes. Or freeze it in a freezer bag for up to three months in an airtight container. Reheat in the microwave, oven, or on the stove.

INGREDIENTS

One huge cauliflower, divided into pieces

One tablespoon of olive oil

1/4 tablespoon of finely chopped garlic

3–4 bulbs of coarsely chopped spring onions

7-8 french beans, cut coarsely

One medium carrot, cut finely

¼ little red bell pepper, cut finely

¼ cup coarsely sliced yellow bell pepper

Half a tablespoon of soy sauce

crushed peppercorns for black tea

Add salt to taste.

tbsp of vegetable stock

Three teaspoons of vinegar

2–3 chopped spring onion greens

Spring onion greens, sliced, as a garnish

PREPARATION

1. Place cauliflower florets in a food processor and coarsely process. Place aside. 2. In a nonstick pan, heat the olive oil and sauté the finely chopped garlic. Sauté the spring onion bulbs until transparent.

3. Stir in the French beans and carrot. Cook for around 1-2 minutes.

4. Add the chopped red and yellow capsicums and sauté thoroughly. Cook for around 2-3 minutes. 5. Toss in the cauliflower, soy sauce, crushed black peppercorns, and salt. 6. Stir in the vegetable stock. Cook for 2-3 minutes, covered. 7. Stir in the vinegar. Toss in the chopped spring onion greens and remove from the heat. 8. Transfer to a serving basin and top with spring onion greens. Serve immediately.