Saumya Gupta

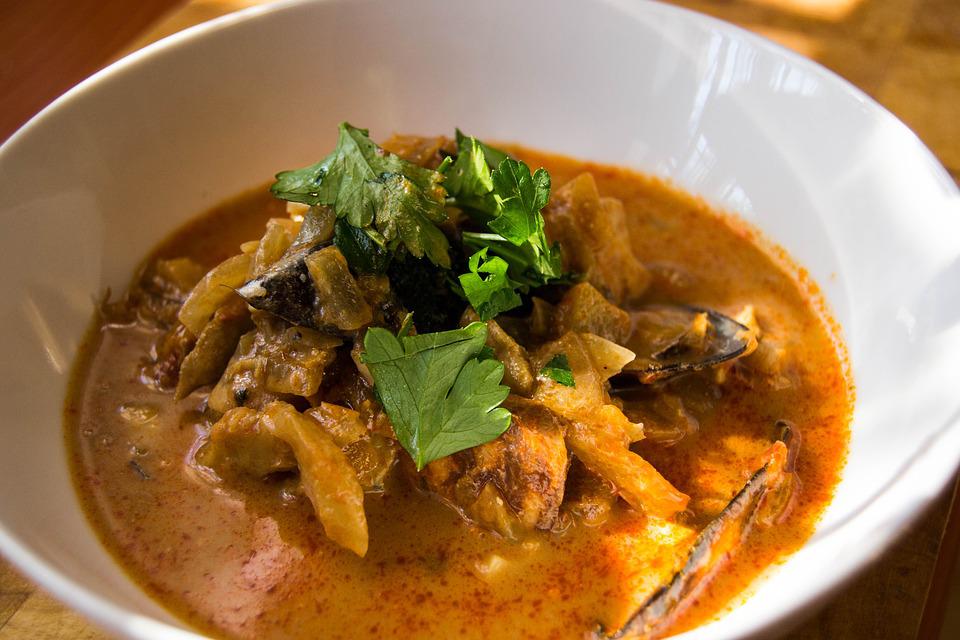
HOW TO MAKE FISH WITH FENUGREEK LEAVES CURRY?

Fish fenugreek leaves curry is a tasty and healthy fish curry recipe that is very unique in taste and flavors. The fenugreek leaves present in this curry make it super healthy and delicious because apart from fenugreek’s unique flavor it has numerous health benefits. Fenugreek leaves are added to soo many different types of curries. Fishes have omega-3-fatty acids and vitamins D and B in a rich amount which makes fish a very healthy food option.

INGREDIENTS:

  • Sliced Fish- 250 gm
  • Chopped Fenugreek leaves/ Kasuri methi- 2 cups
  • Ginger paste-1tsp
  • Garlic paste- 1tsp
  • Yogurt- ½ cup
  • Chopped onion- 1 cup
  • Crushed methi seeds- 1tsp
  • Mustard oil- 2 tbsp
  • Turmeric powder- ½ tsp
  • Coriander powder- 2 tsp
  • Red chili powder as per taste
  • Salt to taste
  • Lemon juice- 2tsp

Preparation method:

  •  Firstly, clean the fish with water and apply some salt to it and keep it aside for 15 minutes.
  • Then heat 1 tbsp oil in a pan.
  • After that wash the fish slices and fry them until became slightly brown on both sides.
  • Again heat the oil in a pan and add methi seeds, ginger, garlic, and onion and fry it properly until became nicely browned.
  • Now put yogurt and cook for 1 minute.
  • After that add turmeric powder, coriander powder, red chili powder, and salt, and cook until the oil starts to separate from it.
  • Then add fish, fenugreek leaves, and water and cook for 10-12 minutes.
  • At last add lemon juice and cook for a minute.
  • And your fish with fenugreek leaves curry is ready.
  • Enjoy it with rice or chapatti.

PREPRATION TIME: 10minutes

COOK TIME: 30 minutes

TOTAL TIME: 40 minutes

Advantages of fish eating:

  1. Improves memory.
  2. Prevent cancer.
  3. Makes your hair strong and healthy.
  4. Maintain blood pressure.
  5. Improves vision.
  6. Help in reducing stress
  7. Good for heart health.
  8. Anti-aging

Disadvantages of fish eating:

  1. Pregnant, lactating, or trying to conceive women should avoid fish.
  2. Should not be given to small kids can cause hindrance in muscle growth.
  3. Avoid consuming milk after eating fish.

For more recipes: Click here

If you are facing issues in dropping your weight, please take this free-body type assessment: Click here

HOW TO MAKE EGGPLANT LASAGNA?

Eggplant lasagne is a low-carb recipe. Lasagna is an Italian dish. In this recipe, pasta sheets in lasagna are replaced by roasted eggplant slices as they are low in carbs. It gives you absolute flavor and taste which is needed in lasagne but without the noodles. This recipe is healthy as well as delicious. It is a mouth-watering recipe. You can have this eggplant lasagna for dinner with your favorite salad.

INGREDIENTS FOR EGGPLANT LASAGNA:

  • Eggplant- 3 to 4
  • Egg – 1
  • Ricotta
  • Shredded mozzarella -1 cup
  • Parmesan cheese- ¼ cup
  • Crushed garlic- 3-4 cloves
  • Thawed Spinach- 10 ounces
  • Chopped parsley or basil- 1tbsp
  • Kosher salt – 2 tbsp
  • Black pepper- ½ tsp
  • Olive oil – 1 tbsp

METHOD:

Firstly, slice the eggplant into long slices about ½ inch thick. (You don’t have to peel the eggplant before slicing).

After that,  salt the eggplant and leave it for 20 minutes.

After 20 minutes, wipe off the excess moisture from it and make it dry.

Then brush the eggplant slices with olive oil and roast them in the oven for 400 degrees for 20 minutes until the slices become soft.

Now, prepare the filling. For this, take a mixing bowl and put the beaten egg with ricotta, parmesan cheese, mozzarella, garlic, oregano, spinach, parsley, and basil.

Add some kosher salt and black pepper to it and mix well.

Then, take a baking dish and pour pasta red sauce on the bottom and spread it.

Arrange eggplant slices on the bottom of the baking dish. Then, spread a layer of ricotta filling and then a layer of pasta sauce and repeat the process one more time.

And then, top the final layer of sauce with ½ cup mozzarella cheese and ¼ cup parmesan cheese.

Finally, cover the baking dish with foil and bake it in the oven at 375 degrees F for 20 minutes until the cheese is melted nicely and became golden brown.

Now give 10 minutes to let everything settle down then cut it and garnish with basil or parsley.

TIPS:

You can prepare the roasted eggplant and filling one day before and refrigerate it to use the next day. It will save you time the next day.

You can refrigerate this eggplant lasagna for up to 4 days and reheat it when want to eat it.

For more recipes: Click here

If you are facing issues in dropping your weight, please take this free-body type assessment: Click here

SABUDANA PANEER POHA

HOW TO MAKE SABUDANA PANEER POHA?

Sabudana paneer poha is a perfect breakfast recipe. Most people eat sabudana during fasts. Because it contains starch and keeps you full for a longer time. This sabudana paneer poha is perfect for such times because it gives you calories as well as proteins in a good amount and helps you work throughout the day.

This recipe contains good quantities of iron, calcium, folate, and protein. So helps in bone strengthening, prevents anemia, promotes a healthy nervous system, supports heart and muscle health, and also improves blood circulation.

INGREDIENTS FOR SABUDANA PANEER POHA:

  • Moti(Smallest) Sabudana – 100gm
  • Paneer cubes -50 gm
  • Chopped tomato -1
  • Chopped Green chilli-1
  • Coriander leaves-1tbsp
  • Cumin seeds- 1tsp
  • Black pepper- 1 tsp
  • Curry leaves – 3-4
  • Roasted peanuts – 1 tbsp
  • Salt as per taste
  • Water- ½ cup
  • Oil -2tsp

PREPARATION:

  • Wash sabudana 2-3 times thoroughly. Soak sabudana for 1 hour before making poha.
  • Shallow fry paneer cubes and put them aside.
  • Now, heat the oil in a pan.
  • Put cumin seeds and curry leaves in the oil and crackle it.
  • Then, add tomato and green chilies and sauté it. ( you can also add vegetables of your choice)
  • After that add salt and black pepper and mix it.
  • Add sabudana and water and cover it with the lid and cook for 10-15 minutes.
  • At last, add paneer cubes and roasted peanuts and mix well.
  • Your Paneer Sabudana Poha is ready.
  • Garnish it with coriander leaves and serve it.

BENEFITS OF SABUDANA:

Rich in calcium- being a great source of calcium helps in strengthening your bones.

Protein-rich- Sabudana contains certain important amino acids which makes it a good source of plant-based protein.

Maintain blood sugar level- sabudana taken in small servings helps in maintaining diabetes.

A powerhouse of iron- it contains iron in a very good amount which helps in treating iron deficiency anemia.

For skin and hair: the powdered or soaked mashed paste of sabudana helps improve appearance by revitalizing skin and strengthens hair because of the high amino acid content and antioxidants present in it.

For more recipes: Click here

If you are facing issues in dropping your weight, please take this free-body type assessment: Click here

paneer stuffed mung dal cheela

PANEER STUFFED MUNG DAL CHEELA

Cheelas is one of the most popular healthy breakfast options in our day-to-day life. They are easy to make and healthy for us. There is various type of cheelas we make in our houses. But this paneer stuffed mung dal cheela is super delicious, high in protein, and low in carbs. You should try this cheela recipe. This cheela is perfect for breakfast, lunch, or dinner. We can also carry this cheela in our lunchboxes because this is very filling and healthy. We can have this cheela with tomato garlic chutney or green chutney.

INGREDIENTS FOR PANEER STUFFED MUNG DAL CHEELA:

FOR STUFFING:

  1. Grated Paneer -100 gm
  2. Onion small finely chopped- 1
  3. Capsicum small finely chopped -1
  4. Green chili finely chopped- 1
  5. Coriander leaves- 1 tbsp
  6. Black pepper- 1tsp
  7. Cumin seeds -1tsp
  8. Oil- 1tsp
  9. Salt as per taste

FOR CHEELA BATTER-

  1. Soaked Mung Dal- 100gm
  2. Ginger- ½ inch
  3. Green Chilli- 1
  4. Cumin – 1tsp
  5. Salt as per taste
  6. Turmeric- ½ tsp
  7. Fresh Coriander leaves

PREPARATION METHOD:

STUFFING:

Firstly, heat the oil in a pan. When oil is heated put cumin seeds in it.

Then, add onion and capsicum and sauté it.

After that add paneer, green chili, black pepper, and salt in it and mix it for 2-3minutes.

 Now, put the flame off and mix chopped coriander leaves into the stuffing.

Then, transfer the stuffing to a bowl and put it aside.

CHEELA BATTER:

At first, wash the soaked mung dal 2- 3 times.

Then, transfer it into the grinder and add ginger, green chili, cumin, turmeric, and salt and grind it until turns into a smooth paste.

Mix chopped coriander leaves into the batter.

FINAL PANEER STUFFED MUNG DAL CHEELA PREPARATION:

First, take a non-stick Tawa and grease it with little oil, and heat it.

Now, spread the batter evenly over the Tawa and let it cook for 1 minute.

Then add paneer stuffing into the cheela and fold it.

Finally, take off your cheela from the Tawa and eat it or serve it with your favorite chutney.

Hope you like the recipe.

For more recipes: Click here

If you are facing issues in dropping your weight, please take this free-body type assessment: Click here

spinach dumpling

HOW TO MAKE QUICK SPINACH DUMPLINGS?

Spinach dumplings are healthy, delicious, and packed with iron and protein. These vegetarian dumplings can give you a feeling of eating meatballs. So, they are a vegetarian version if you wanted to avoid meat but crave it. Spinach is a powerhouse of essential vitamins like folic acid and vitamin A, which are essential for growth and vitality.

We will use the technique of steaming to cook these dumplings instead of frying them to avoid excess oil in them. So, it will help in making it a low-calorie dish. The rich green color of the dish makes it more appealing.

INGREDIENTS OF SPINACH DUMPLINGS:

  • 2 cups chopped spinach
  • 2 tbsp besan
  • 1 tsp chili paste
  • 1 cup wholewheat flour
  • 2 tsp low-fat curd
  • A pinch of asafoetida
  • ½ tsp sugar
  • 1 tsp oil
  • Salt as per taste

 Method to make Spinach Dumplings:

Put spinach, chili paste, whole wheat flour, besan, curd, asafoetida, sugar, oil, and salt in a bowl and mix to form a dough.

Now make a round ball of equal proportion from the dough.

Arrange the dumplings on a steamer and steam for 7-8 minutes or until cooked.

Serve with your favorite chutney.

HEALTH BENEFITS OF SPINACH:

  • Spinach reduces high blood sugar, maintains sugar levels, and prevents cancer.
  • It is also good for skin, hair, and eyes.
  • Vitamin A, B, E, K, and C are present in spinach which promotes healthy skin and prevents premature aging and skin cancer.
  • Minerals such as potassium, copper, zinc, and manganese are present in spinach. They help the body in regulating cell function, body fluids, and heart rate.
  • Spinach is very helpful for treating iron deficiency anemia,
  • It is anti-inflammatory and provides relief from arthritis, osteoarthritis, asthma, and migraines.
  • Help in muscle growth by reducing stress on muscles.
  • Strengthen the bone because of its calcium content.
  • Spinach contains a good amount of fiber which helps in sugar absorption into the bloodstream and helps in maintaining blood sugar levels.

Risk of eating too much spinach:

Consumption of too much spinach is also harmful because it can interfere with the body’s ability to absorb nutrients and can cause kidney stones and gout.

Digestive issues like gas, bloating and cramps can also be created because of eating too much spinach.

Hope you like the recipe.

For more recipes: Click here

If you are facing issues in dropping your weight, please take this free-body type assessment: Click here

HOW TO MAKE OATS VEGETABLE UTTAPAM?


Oats vegetable uttapam is a very yummy and healthy recipe for breakfast, lunch, or dinner. Oats are a very popular “healthy food” eaten for breakfast and baked food items like oatcakes, oat cookies, and bread. There are many types of recipes prepared from oats. Oats vegetable uttapam is one of them. It is a very healthy as well as an easy breakfast option. You can eat them for lunch or dinner as it is full of dietary fibers. So, keep you full for a longer time and helps in weight loss. This recipe is a wonderful combination of important minerals, vitamins, and antioxidants.
Oats vegetable uttapam is low in fat and high in flavors. You can eat it with pudina chutney, coconut chutney, or raw mango chutney.

INGREDIENTS OF OATS VEGETABLE UTTAPAM:

  • 1 Cup Oats
  • ½ Cup Semolina
  • ¼ tsp Asafoetida
  • 1 Cup Yogurt
  • 1 tsp Cumin Seeds
  • ¼ tsp Red Chili Powder
  • A pinch of Sodium Bicarbonate
  • Water as required
  • 1 chopped Onion
  • 1 chopped Tomato
  • ½ chopped Capsicum
  • ½ tsp chopped Green Chilies
  • Salt to taste
  • 2 tsp Extra Virgin Olive Oil
  • ¾ tsp crushed Ginger
  • ½ tbsp Coriander Leaves

Method to make OatsVegetable Uttapam:


Firstly, grind semolina and oats.
Then add asafoetida, cumin, red chili, sodium bicarbonate, yogurt, and ginger paste to the mixture.
Now mix all the ingredients and add water to make a thick batter.
Keep the batter at rest for 10 minutes.
Now, add onion, tomato, capsicum, green chilies, and salt into the batter.
After that, heat a non-stick pan and grease it with little oil.
Then spread the batter on the pan evenly and cook from both sides until turned golden brown.
Finally, garnish it with coriander and serve hot with any chutney you like.

Oats vegetable uttapam:
Prep time: 15 minutes
Cook time: 15 minutes
Total time: 30 minutes
Serving: 6

BENEFITS:

  • Help in lowering blood sugar levels.
  • Rich in antioxidants.
  • Improve digestion.
  • Support skin health.
  • Reduce chances of colon cancer.
  • Improve your gut health.
  • Diabetic friendly
  • It reduces LDL and total cholesterol.
  • Help in weight loss.
  • Reduce the risk of childhood asthma.
  • Relieve constipation.

Hope you like the recipe.

For more recipes: Click here

If you are facing issues in dropping your weight, please take this free-body type assessment: Click here

sprout paneer salad

HOW TO MAKE SPROUT PANEER SALAD?

Salads are the best way to eat colorful, nutrient-dense foods. They are simple, delicious, and filling. You can give a different type of taste and flavors to your salads by making some changes to them. So, if you are craving light and refreshing salad then here is the recipe for sprout paneer salad. It is so delicious and nutrient-dense salad. Also, it contains protein, fibers, vitamins, and minerals. It is low in carbohydrates so helps you in weight loss.

INGREDIENTS OF SPROUT PANEER SALAD:

  • 2 tbsp moong sprouts
  • 1.5 tbsp chopped onion
  • 2 tbsp chopped tomato
  • 1tbsp grated carrot
  • 1tbsp grated beetroot
  • Some chopped coriander leaves
  • ½ cup paneer chopped
  • ¼ tsp black pepper
  • Salt to taste

PREPARATION METHOD OF SPROUT PANEER SALAD:

At first, microwave mung sprouts for 30 seconds.

Add onion, tomato, carrot, beetroot, coriander, and paneer.

Finally add pepper, salt, and lime juice into it and mix well.

Mix all the ingredients and your sprout paneer salad is ready.

STEPS TO SPROUT MOONG BEANS:

  • At first wash the mung beans properly 3-4 times.
  • Put the rinsed mung beans into a clean bowl and pour the filtered water up to 2-3 inches above the beans.
  • Then close the bowl with a lid and soak for 8 hours at room temperature.
  • After 8 hours, mung beans become swollen then drain the water.
  • Properly rinse the beans with clean water.
  • Again keep the soaked beans in a bowl and cover it with a lid for 1-2 days in a dark place at room temperature.
  • After a day sprouts start to grow and in two days sprouts will grow properly.
  • And your healthy and hearty sprouted mung beans are ready to eat.

The duration of sprouting may vary depending upon the quality of beans, weather, and temperature.

Benefits of sprouted mung beans:

  • It has anti-cancer properties
  • Reduces cholesterol and protects against heart diseases.
  • Helps in the detoxification of the body.
  • Diabetic friendly.
  • Easy to digest.
  • Contain great quality plant protein.

Sprouted mung beans are better than raw mung beans because germinating beans reduce the phytic content of mung by 76%.

Hope you like the recipe.

For more recipes: Click here

If you are facing issues in dropping your weight, please take this free-body type assessment: Click here

PICTURE COURTESY: SHOBHA NATRAJAN

falafel

HOW TO MAKE CLASSIC VEGAN FALAFEL?

Classic vegan falafel is a great high protein, gluten-free appetizer. It is tasty, healthy, and easy to make. It can be made baked or fried. For a healthier version, we will bake it. You can enjoy this recipe with salads, sauces, or sandwiches. This dish is typically served in Mediterranean and Middle Eastern cuisines.

Ingredients:

This recipe requires simple kitchen ingredients and can be made in very less time. So, here is what you need-

  1. 1.5 bowl-soaked Chickpeas(you can use canned chickpeas also)
  2. 1 cup chopped coriander
  3. ½ cup chopped parsley
  4. ½ cup finely chopped onion
  5. 2 tsp ginger garlic paste
  6. 1 tbsp sesame seeds
  7. 1 tbsp chickpea flour
  8. Water as needed
  9. 1 tsp baking soda
  10. 2 tsp cumin
  11. 1 tsp chili flakes
  12. ½ tsp pepper
  13. 1 tsp salt

Preparation method of Classic Vegan Falafel:

Soak the chickpeas in water for 7-8 hours.

Drain and rinse chickpeas and put them into a food processor or grinder.

Add coriander, parsley, onion, ginger garlic paste, sesame seeds, chickpea flour, baking soda, cumin, chili flakes, pepper, salt, and water and grind it and give it a mouldable dough-like texture.

Now, make small balls from the falafel mixture using your hands.

And for a healthier version of falafel, we will bake it instead of frying it.

Bake it at 425 degrees F for 25-30 minutes.

You can also use an air fryer for a healthier version.

Finally, your yummy and healthy classic vegan falafels are ready. You can eat them with salad and sauces.

Classic vegan falafel

Prep time: 10 minutes

Cook time: 25 minutes

Total time: 35 minutes

Servings: 15 falafel

Benefits:

  • Chickpeas are a great source of fiber and keep you full for a longer time. They also contain iron, phosphate, magnesium, zinc, and vitamin K. It makes your bones strong, supports heart health, and boosts immunity and fertility as well.
  • Other ingredients of falafel like parsley are rich in vitamin C, K, and A as well as iron, calcium, and magnesium.
  • Onions contain anti-cancerous properties.
  • And spices contain vitamin A and C, which boosts your immunity.

Hope you like the recipe.

For more recipes: Click here

If you are facing issues in dropping your weight, please take this free-body type assessment: Click here

Grilled Chicken

HOW TO MAKE AN EASY HOMEMADE GRILLED CHICKEN?

When we think about eating chicken, our mouth gets filled with water. But then we thought about its long and complex cooking process and we drop the idea of cooking it or ordering it from outside. So, here we are giving you a very simple homemade process of cooking grilled chicken. It not only fulfills your cravings but also gives you good nutrition and prevent you from eating unhealthy type of chicken recipes from the outside.

Grilled chicken is a healthy lunch or dinner option. You can eat this grilled chicken with different types of salads, sandwiches, pizzas, and more. Also, you can refrigerate them after cooking and store them for 2-3 days. So, this is a healthy and quick go-to option when preparing for lunch or dinner.

Grilled Chicken
Image Courtesy: Kanchan Singh

INGREDIENTS:

4 Boneless Skinless Chicken Breast

¼ Cup Olive Oil

3 tbsp Soy Sauce

2 tbsp Lemon Juice

1 tsp Garlic Paste

½ tsp Salt

¼ tsp Black Pepper

½ tsp Oregano

½ tsp Chilli Flakes

PREPARATION METHOD:

  1. At first, take a small bowl and whisk olive oil, soy sauce, lemon juice, garlic paste, pepper, oregano, salt, and chili flakes.
  2. Then, keep the chicken in a pan and pour marinade over the chicken.
  3. Now, keep it in the refrigerator for a minimum of 30 minutes, or up to 8 hours.
  4. After that, place the chicken on the griller and grill from each side for about 5-8 minutes. (grilling time depends upon thickness).
  5. When your grilled chicken is ready, wait for 5-10 minutes before slicing or serving

Grilled chicken:

Serving: 4

Preparation time: 20 minutes

Cooking time: 10 minutes

Total time:30 minutes( plus time of marination)

Tip: If you want to refrigerate the chicken, then keep it whole(avoid slicing).

          Wrap chicken in an airtight bag then refrigerates it to avoid contamination.

Benefits of eating grilled chicken:

  • It gives high protein content and supports muscle mass building.
  • Strengthen your bones.
  • Helps in weight management.
  • Reduce the risk of heart diseases
  • Boosts your immunity.

Hope you like the recipe.

For more recipes: Click here

If you are facing issues in dropping your weight, please take this free-body type assessment: Click here

egg cheese muffin

HOW TO MAKE EGG CHEESE MUFFINS?

Egg cheese muffin is a protein-packed, gluten-free, super quick breakfast recipe. They are budget-friendly, nutritious, and easy to cook. If you have significantly less time and you have to cook something delicious as well as nutritious then you should try this recipe must. We can carry these muffins in lunches and have them in evening snacks or meatless dinner. This recipe is loved by kids. We can refrigerate these muffins and eat them later. These muffins are keto-friendly, travel-friendly, and protein-packed.

Ingredients:

  • 6 eggs
  • 1 cup shredded Cheddar Cheese
  • 1 cup shredded Parmesan Cheese
  • ¼ tsp Oregano
  • Salt as per taste
  • Pepper as per taste
  • Choco chips

Preparation:

At first, whisk the eggs in a large bowl very well.

Then add salt, black pepper, and oregano and mix it evenly with the eggs.

Now add cheddar cheese and parmesan cheese and mix them well.

After that, to bake the egg cheese muffins preheat the oven to 350 degrees. And take a silicon muffin pan and put the prepared egg mixture into the molds of the muffin pan.

Fill only half the mould with the egg cheese mixture because when we bake the muffins the size will increase.

Put some chocochip over muffins.

Now place the muffin pan in the oven and bake for 30 minutes or until the crust turns golden brown.

And your super delicious healthy egg cheese muffins are ready. You can have them with fruits and toast for a more nutritious breakfast.

Also, you can refrigerate them and reheat them before consuming them.

Egg and cheese muffin

Prep time: 5 minutes

Cooking time: 10 minutes

Total time: 15 minutes

Serving: 10

Tip: If you don’t have a muffin pan or if you don’t want to give it a muffin shape then you can make it in a baking dish also. You need to grease the pan and pour the egg cheese mixture into it and bake for 20-25 minutes. This can be called a frittata version.

Pro tip: Eggs contain the highest biological value along with milk for protein. One egg contains 7 gm of high-quality protein in it.

Hope you like this recipe.

For more recipes: Click here

If you are facing issues in dropping your weight, please take this free-body type assessment: Click here