Mehar Jamil

How to make Keto Samosa ?

Keto samosa !! yes you heard it correct, Samosas can be fit into keto recipes too. Samosa is everyone’s favorite go to dish. The freshly cooked veggie center folded in a thin-crusted pastry always turns out to be what you expect: delightful. But since the traditional samosa wrapper and potato filling don’t cut it on a low-carb diet, we have been experimenting to come up with a rivaling low-carb version. In this recipe we used a keto-friendly dough–One that’s reliable and foolproof. This keto samosa contains only 5gm Carbohydrate.

Ingredients

For the filling:

  • 1 tablespoon butter
  • 200gm cauliflower finely chopped Or you can use minced Chicken/Mutton qeema
  • 1 medium onion 
  • Salt as per taste
  • 1 tablespoon fresh grated ginger or you can use ginger paste
  • 1/2 teaspoon coriander ground
  • 1 teaspoon garam masala ground
  • 1 teaspoon cumin ground
  • 1/4 teaspoon cumin seeds whole
  • 1/8-1/4 teaspoon red chili flakes
  • 1/4 cup fresh coriander chopped

For the dough:

  • 3/4 cup super fine almond flour
  • 1/4 teaspoon cumin
  • 1/2 teaspoon salt
  • 250gm mozzarella cheese finely shredded

* TIP – You can also use ready made keto tortilla for the outer covering.

Method of cooking keto samosa

For the filling:

  1. Preheat a large skillet over medium heat. Add butter. When butter has melted and stopped foaming, add the cauliflower/Chicken and onions.
  2. Sprinkle the salt over the vegetables. Cook, stirring occasionally, until the edges have started to brown and the vegetables are cooked through. 
  3. Stir in ginger, coriander, garam masala, ground cumin, cumin seeds, and chili flakes. Stir for 1-2 minutes to allow the spices to toast. Turn off the heat.
  4. Stir in the coriander. Taste and adjust seasoning. Add salt to taste.

For the dough:

  1. Set up a double boiler. Can use a large sauce pan with about 1 1/2-2 inches of water in it and a medium mixing bowl that fits on top.
  2. Bring the water in the lower part of the double boiler to a simmer over high heat. Once it is simmering, turn heat to low. 
  3. Meanwhile, place the almond flour, cumin, salt, and mozzarella in the top part of the double boiler. Stir together. 
  4. Stirring the mixture constantly, heat until the mozzarella cheese melts and the mixture forms a dough.
  5. Turn the dough out onto one of the pieces of parchment and knead a few times to equally distribute the ingredients. Shape the dough into a small bowls (peda) and make a roti out of it.
  6. Cut that roti into half and keep aside.

To assemble:

  1. Spoon the filling onto the center of each semi circle roti, Fold it like samosa and keep on parchment paper.
  2. Make fork holes in each samosa to provide a place for steam to release. Bake in a preheated oven for 14-17 minutes or until golden brown or Air Fry them for 15 mins.

Your keto samosa is ready to be eaten with keto chutneys

If you are struggling shedding weight. You can talk to us by taking this assessment: Click here

For more information click here

Easy way to make Keto Paneer cutlets/tikki

The keto paneer cutlets recipe is one of the most delicious and an easy take on keto recipes. Most importantly, they are healthy, and best after-gym snacks for all vegetarians. 

Moreover, these keto paneer cutlets are one of the most important sources of protein and calcium, on a keto diet. So, scroll down to learn more about this recipe.

INGREDIENTS

  • 250 gm Paneer (Grate it finely)
  • 1 Finely Chopped Onion
  • 2-3 tbsp Almond flour
  • 1 eggs
  •  Finely Chopped Coriander
  • 1 tsp Garam Masala
  • 1 tsp Coriander Powder
  • Salt to Taste
  • 5 Cloves of Chopped Garlic
  • 2 Finely Chopped Green Chilies
  • 30 gm Grated Cheese
  • 2 tsp Ghee or unsalted Butter

METHOD

  1. Take a mixing bowl with paneer in it. Then, add the turmeric powder, garam masala, coriander powder, and salt.
  2. Now, add the chopped garlic. Now, mix and mash it thoroughly.
  3. Thereafter, include the finely chopped onions, to the paneer cutlet mixture.
  4. The grated cheese and finely chopped green chilies, are to be added to the above dough.
  5. To provide a better binding capacity to the cutlets, add almond flour to the dough.
  6. Prepare 7-9 medium-sized balls out of the final mixture. You can flat them into a patty or any other shape of cutlet.
  7. Now whisk the egg in a separate plate and egg wash all the patties.
  8. In a pan, melt & heat butter/ghee, fry the paneer cutlets. Fry them on a medium flame until they turn golden brown.

Tip– Almond flour can be added a little more, if you find the dough wet or loose.

Try this super versatile recipe as evening snack or even as a side dish with any meal!! You can also try our other Keto recipe Keto lemon chicken, keto nuggets, keto pizza, keto halwa

For more information click here

If you are struggling shedding weight. You can talk to us by taking this assessment: Click here

Easy Chicken Satay recipe for Paleo diet

Chicken Satay is great for an appetizer or a main dish. You can prep everything ahead of time, which is always great if you are having a party or want to have stuff ready before you get home from work. The chicken needs to marinate at least 2 hours, but you can let it marinate overnight if you want extra flavor. 
Satay sauce usually includes peanut butter and soy sauce, but you can substitutes these recipes with almond butter too.

These satay recipe is easy to make and on the other hand delicious too. Do try them and let us know your experience..

INGREDIENTS

  • 750gm , skinless chicken breast, cut into ½” stripes
  • wooden skewers
  • For marinade
    • 1 tsp lemon zest
    • 2 tsp lemon juice
    • ½ tsp ground coriander
    • 1 tsp turmeric
    • ½ tsp chili powder
    • 1 tbsp Peanut Butter or Almond butter
    • 2 tbsp olive oil
  • For sauce
    • 3 tbsp tahini (sesame butter)
    • 1 tbsp lemon juice
    • 3 tbsp coconut milk/Almond milk
    • 1 garlic clove, minced
    • pinch of chili powder

Tip: You can use ready made Tahini Sauce available in market 

METHOD

  1. To make the marinade, place all the ingredients in a blender and process until smooth.
  2. Place the chicken in a shallow dish.
  3. Pour the marinade over the chicken and toss to coat.
  4. Cover with plastic wrap and refrigerate for minimum 30 minutes or 2 hours or overnight depending on your work and time.
  5. To make the sauce, mix all the ingredients together until well combined and set aside.
  6. Thread chicken onto skewers. Preheat a grill pan or normal pan over medium high heat.
  7. Lightly oil the grill pan with extra olive oil.
  8. Grill the chicken in batches for 2-3 minutes on each side.
  9. Sprinkle with spring onions and serve with sauce

You can also try our other paleo recipes such as paleo pizza, paleo burger, balsamic chicken

If you are facing issues in dropping your weight, please take this free-body type assessment: Click here

For more recipes: Click here

How to make Burgers for Keto/Paleo diet

Paleo Chicken Burgers are a flavourful way to switch up your usual burger. These are served with slices of cucumber, tomatoes, red onion and a delicious ginger and parsley sauce. Serve them in a lettuce bun to make them more keto/paleo friendly.

If you are a die hard burger lover and can’t resist eating them than these paleo chicken burgers are for you guys and truly think there is no limit to the number of times a week you can eat them.

The chicken patties are so so flavourful and have a refreshing crunch.

Reason to love this Keto/Paleo Chicken Burger:

  • Flavouful 
  • Healthy
  • Unique
  • Refreshing and crunchy

I’m drooling over these burgers while writing this recipe 🙂 … You can also try our Paleo Pizza, Keto Pizza recipe

INGREDIENTS

Chicken Patties

  • 500 gm ground chicken
  • 3 cloves garlic minced
  • 1/4 cup chopped Cilantro/ Coriander/ Parsley
  • 1 1/2 tbsp grated red onion
  • 1 tbsp grated ginger
  • 2 tbsp lemon juice
  • 1/2 tsp lemon zest
  • 1/2 tsp  pepper
  • 1 tsp cumin powder
  • 2 tsp coriander powder
  • 1 tsp paprika
  • 1/2 tsp salt

Ginger & Parsley Sauce

  • 1/4 cup mayonnaise
  • 1 tsp lemon juice
  • 1/2 tbsp chopped mint
  • 1 tbsp chopped parsley
  • 1 tsp finely chopped ginger
  • 1/4 tsp cumin

For Serving

  • 1 head lettuce
  • 1 large tomato thinly sliced
  • 1/2 red onion thinly sliced
  • 1/2 cucumber cut into thin slices or ribbons

METHOD

  • In a bowl combine all of the ingredients for the chicken patties and use your hands to mix everything together so the spices are well incorporated in the meat. Divide the meat into 4 portions and form into patties.
  • Heat a grill pan Or normal pan on medium high heat. Grill the patties for 5 minutes per side until cooked through.
  • While the patties are cooking, in a bowl combine all of the ingredients for the sauce and stir until well mixed. Set aside.
  • Cut the lettuce into quarters and separate each quarter into two halves.
  • To assemble the burgers spread the sauce on the inside of the lettuce. Top with 2 slices of red onion, sliced tomato and cucumber and place patty on top. Place the other half of the lettuce leaf on top like a sandwich and wrap the burger in parchment paper to make it easier to eat.

Enjoy your burgers !!!

For more information click here

If you are struggling shedding weight. You can talk to us by taking this assessment: Click here

How to make Balsamic Chicken with Asparagus

Balsamic Chicken is a best option for people following paleo diet. It combines boneless skinless chicken breasts, tomatoes, asparagus, and balsamic Vinegar. The end result is an easy mouthwatering tender chicken recipe that you can feel good about eating and feeding to your family. It’s a very easy recipe with minimal ingredients.

This beautiful dish can be a welcome sight on your dinner table. You can serve this with rice or angel hair pasta but it is quite hearty all by itself for those of you that are watching your carbs.

You can also try our recipe of Chicken Marinara

Lets go ahead with the recipe, this much quantity will suffice 2 servings.

Ingredients

  • 3 tablespoons balsamic vinegar
  • 1 ½ tablespoons honey / Diabetic can use stevia drops
  • ⅛ teaspoon red pepper flakes
  • 500 gm chicken breast
  • 2 tablespoons olive oil
  • salt, to taste
  • pepper, to taste
  • 1 tsp Italian mixed Herbs
  • 300 gm fresh asparagus, trimmed of tough ends, chopped into 2-inch*
  • 1 ½ cups carrot
  • 2 tomatoes, cut into 4 pcs.

* You can also use green beans, green peas, broccoli, zucchini, green peppers, brussels sprouts and many other delicious green vegetables if Asparagus is not available.

Preparation

  1. In a mixing bowl, Italian dressing herbs , balsamic vinegar, honey and red pepper flakes, set aside.
  2. Season chicken with salt and pepper.
  3. In a large skillet over medium heat, heat oil. Add chicken, season with salt and pepper, and sear until golden.
  4. Cook chicken breasts on one side for 10 minutes, then turn. Add half of the dressing mixture, and cook for another 10 minutes. Chicken juices should run clear. Set chicken aside.
  5. Add asparagus, carrots, and tomatoes to the same skillet, season with salt and pepper, stir frequently until the veggies are tender, about 4 minutes. Plate veggies and chicken.
  6. Add remaining dressing mixture to skillet and reduce for about a minute, until the sauce is thickened. Dress the chicken and veggies with the sauce.
  7. Enjoy!

Nutrition (per serving): 461 calories, 53 g protein, 13 g carbohydrates

Tip – You can add little more honey while cooking to balance the Balsamic vinegar

If you are struggling shedding weight. You can talk to us by taking this assessment: Click here

For more information click here

WHAT IS OMAD ? Let’s learn more about it..

OMAD means eating one meal in a day. It doesn’t specify what you eat, or even what time you eat. It simply directs you to eat once.

OMAD is the longest form of time-restricted eating, equivalent to a 23:1 fast (fasting for 23 hours and eating in a 1-hour window). In its purest sense, OMAD doesn’t dictate calorie restriction or specific macronutrient composition. That said, we encourage you to continue your healthy, low-carb diet at that meal.

If you follow weight loss trends, then you may have come across this one meal a day approach. To some, it may sound extreme and like something that is more of a hassle than it is worth. But, in fact, there are many advantages to this fasting style. This pattern of eating can have some profound health benefits like weight loss, improving cognition, and preventing disease. Not to mention, it can help you save time and money. Once you get used to it, it isn’t nearly as hard as it sounds.

You can also learn about Intermittent fasting by clicking this Button

OMAD Working on Body

One meal a day is not so much a diet but rather a particular version of intermittent fasting. Intermittent fasting involves alternating between periods of eating and periods of consuming no calories at all (also known as fasting). As the name implies, with OMAD, you eat only once per day. You spend 23 hours of the day fasting and have a one-hour eating window. During that time, you eat your single, large meal. You consume the number of calories you need for the entire day during those 60 minutes.

The extended fasting period during the one meal a day diet is beneficial to the body for many reasons, many of which I go into more detail below. One of the main things to understand is when we fast, the Fat Storing Hormone levels in the body drop. Correcting Fat Storing Hormone resistance and blood sugar issues is essential in avoiding common health problems. Doing this through fasting can help solve a lot of problems throughout the body and can help you with everything from weight loss to memory issues.

To whom OMAD diet applies ?

It is important to note that only people who have prior experience with intermittent fasting should try the OMAD diet. Do not go straight from your regular habits to a single meal per day. This causes excessive stress on your body, which only harms you rather than help. Build yourself up to the fasting schedule of one meal per day by gradually increasing the time you fast daily.

Best Time to do OMAD

It is up to the individual to determine when is the best time to consume his/her calories for the day. Some people prefer to eat all of their daily required calories at breakfast time, some at lunch, and some at dinner. But, if you want to work with the body as much as possible, eating later in the day is preferred. Our bodies spend much of the day under the control of the sympathetic branch of our nervous system. This system controls the fight or flight response and helps us respond and react to stress. So during the day, our bodies are naturally a little more stressed.

As the day goes on and we transition into night, the parasympathetic branch of the nervous system kicks in. This branch promotes rest and digestion. In the latter part of the day, our bodies are better suited for good digestion. This is one reason why we recommend eating your one meal either later in the afternoon or in the evening.

Eating later in the day also makes it convenient to enjoy your meals with others. You can still participate in family dinners around the dining room table, go to a dinner party, or join friends out for an evening meal.

Benefits of OMAD

One-Meal-A-Day (OMAD) Diet: Benefits & Foods To Eat And Avoid

Clinicians experienced in prescribing intermittent fasting and low-carb nutrition frequently use OMAD as a tool to help with weight loss stalls. When a patient is eating low carb but isn’t losing weight as expected, temporary use of OMAD can help kick-start weight loss.

Many who eat an OMAD pattern do so for the ease of preparing food and eating just once each day. This can be especially helpful for those who travel frequently, perform shift work, or have hectic and busy schedules.

Think about how much time you spend planning, shopping for, and preparing meals. If you eat three meals per day, how much time could you save cutting that by two-thirds?

As a form of time-restricted eating and intermittent fasting, OMAD may help reduce hyperinsulinemia, control diabetes and improve metabolic syndrome. Consistent clinical experience shows that widening the fasting window can help improve these metabolic conditions. So, when used appropriately, OMAD could deliver better results than shorter fasts.

Some see OMAD as an “easy” way to reduce calorie intake. When you only allow yourself to eat in a 30-to-60-minute time window, it is physically difficult to exceed your daily calorie needs. It’s not impossible but it sure is challenging. For those who benefit from a firm schedule that restricts snacking, OMAD can be the strategy that works best.

Lets have a look on some of the best things you get out of eating one meal a day? Here are the top eating one meal a day benefits:

1. Save Money

When you eat only one meal a day, there is no doubt you will save money.

2. Save Time

People spend a lot of time on food. Whether it’s due to grocery shopping, meal prepping, eating, cleaning up, or packing something for on the go, the work and time to make several meals a day add up. Without as much time dedicated to food, you can do other things more productive and exciting to you.

3. Improve Digestion

Fasting for so long each day can really help take the pressure off the digestive system. It gives your gallbladder, stomach, pancreas, and large bowel a rest. The one meal a day meal plan can be especially helpful for people with digestive issues, like irritable bowel syndrome.

4. Boost the Immune System

Going for long periods of fasting is a powerful way to increase immune activity. Whether you have allergies, autoimmune conditions, or inflammatory conditions, intermittent fasting is a great choice.

5. Increase Autophagy

Autophagy refers to a process in the body in which damaged cell parts are recycled into new tissues. It also helps rid the body of things like viruses, mold, fungi, and candida. Fasting boosts this recycling and detoxifying process.

6. Live Longer

Fasting is a great anti-aging tool that promotes long, healthy living. This is linked to how fasting increases autophagy.

7. Reduce Hunger

You might think that if you are limited to food only once a day, you’ll be starving the rest of the day. But when you fully adapt to this way of eating and your body fully transitions into fat-burning mode, hunger actually goes away. You feel a lot less hungry overall.

8. Have Great Skin

This pattern of eating can help your skin look and feel great. You may experience smoother, younger skin due to the anti-aging effects and increased autophagy benefits.

9. Improve Mood

A lot of mood problems are due to underlying blood sugar problems. This is the case for things like depression and anxiety. When you fast and Fat Storing Hormone and blood sugar issues get under control, your mood improves, and you feel so much better.

10. Increase Cognitive Function

This pattern of eating is really great for boosting cognition. It can benefit things like dementia, poor memory, lack of focus, and trouble concentrating. Once your body is used to this style of eating, all of that improves.

11. Decrease Inflammatory Conditions

Relief from conditions such as arthritis, tendonitis, and bursitis can happen when you only have one meal a day. This is because the blood sugar issues are often at the root of inflammation. When you correct those problems, the inflammation decreases.

12. Decrease Blood Pressure

High Fat Storing Hormone is behind high blood pressure. OMAD decreases Fat Storing Hormone in the body, bringing your blood pressure down along with it.

13. Turn the Body into a Fat Burning Machine

One of the benefits people love the most about the OMAD diet is helping them lose weight. When in full fasting mode, your body becomes well-adapted to burning fat. When you eat this way, you burn fat and get a flatter belly.

14. Improve Your Personal Discipline

The ability to withstand any food consumption for 23 hours takes true willpower. Doing this extreme intermittent fasting schedule is a practice. It is one that takes a lot of self-discipline. It as an exercise in strengthening your personal willpower and discipline.

15. Fix a Slow Metabolism

If you have a slow metabolism, then this is truly the style of eating meant for you. It helps raise your metabolism and shed fat.

Look into Nutrient Dense food options while doing OMAD


Some versions of the one meal a day diet allow you to eat anything you want (really, anything at all) in your single meal. I recommend making that meal as nutrient dense and full of hearty superfoods as possible. Avoid carbs and eat lots of healthy vegetables (a plant-based diet), along with healthy sources of fat and lean protein. It helps you provide your body with enough nutrients to stay healthy. It is important to make healthy food choices while eating only one meal a day. Make sure you get all the micronutrients and macronutrients your body needs in that short window.

Concerns about OMAD

1. Eating disorders

Any eating pattern that promotes a cycle of food restriction followed by extra food consumption can trigger disordered eating behavior in susceptible people. So if you have a history of an eating disorder, you should probably avoid OMAD.

2. Chronic caloric restriction

Creating an environment in which you naturally reduce caloric intake is one of the clinical benefits of OMAD. The other side of that coin is that it can be difficult to obtain adequate calories if eating OMAD long-term, without interruption. OMAD can then start to look a lot like chronic caloric restriction. Although chronic caloric restriction helps with initial weight loss, it poses long-term concerns because it tends to lower resting metabolic rate, which makes weight loss very difficult to maintain.

3. Inadequate protein intake

Just as OMAD promotes caloric restriction, it can also lead to protein restriction. Since protein helps you feel full and satisfied, it can be difficult to eat your entire daily requirement in one sitting. Therefore take advise of your Dietitian before planning OMAD.

4. Taking medications with food

For those who need to take prescription medications with food more than once per day, OMAD presents a significant hurdle. If this is the case for you, discuss with your healthcare provider if other options exist. If not, then OMAD is likely not safe for you.

Warning signs

Many people do well – even thrive – with time-restricted eating and intermittent fasting. Others are more susceptible to side effects. Feeling a little hungry and a little low in energy are expected. But feeling unwell, extremely fatigued, dizzy, nauseated, or having other severe side effects are abnormal responses to intermittent fasting and OMAD. If you experience any of these severe side effects, OMAD is likely not the best choice for you. You can work with your Nutritionist to determine if any changes (like shorter fasting regimens or greater adaptation to fat burning through reduction of dietary carbohydrates) could make it an option in the future.


“Best use” of OMAD

OMAD appears to be a powerful tool to help with weight loss and metabolic health. Suggestion of using OMAD one to three times per week, on non-consecutive days, could be an effective tool. This is not a science-based protocol with plenty of high-quality evidence, but is instead based on the existing evidence plus clinical experience.

Just remember, OMAD is not a license to eat whatever you want. What you eat for your one meal still matters. We recommend you stick with your low-carb plan on OMAD and non-OMAD days alike. In fact, clinical experience suggests that a well-formulated low-carb diet makes intermittent fasting and OMAD easier to do by reducing hunger and cravings. So, you can consider low carb as the secret weapon to enhance your OMAD superpower.

Here is a sample week utilizing OMAD:

  • Monday: eat two meals with 16:8 time-restricted eating
  • Tuesday: OMAD, around 1000 calories
  • Wednesday: eat two meals with 16:8 time-restricted eating
  • Thursday: OMAD, similar to Tuesday
  • Friday: eat two meals with 16:8 time-restricted eating
  • Saturday: free day to eat how your social schedule dictates (just stay on your low-carb plan!)
  • Sunday: OMAD, similar to Tuesday

You can download Sample OMAD plan by clicking this download button below

Few Options for OMAD Meals Veg/Non Veg

  1. 200gm Yogurt mixed with fruits and 1tsp seeds + 5 soaked almonds + 2 walnuts mixed altogether + 1 bowl Tahini chickpea salad 1 bowl + Cauliflower mint paratha 2 + 1 Bowl Beetroot raita
  2. Kiwi 1 + 5 soaked almonds + 2 walnuts + Thick curd 1 big bowl + Rajma/Lobia/Chola 2 k + Three bean chaat 1k + Oats wheat roti 1
  3. Roti -1.5 + Malai matar methi-2 k + Lauki raita-1 k + Green Salad 1 plate + Any seasonal fruit 1
  4. Cauliflower/broccoli rice-1.5 kat + Chicken manchurian-2 kat + Cucumber salad-1 plate + Coconut-2 pc + walnut-1 + Any seasonal fruit 1
  5. Tandoori chicken breast (2) salad with onion, capsicum and mint chutney-1 bowl + Cream of mushroom soup-1 bowl + Chia seed pudding with nuts and fruits -1 kat

Conclusion

So, is OMAD a healthy and helpful tool for weight loss and metabolic improvements? Yes, it can be. But use it wisely and pay attention to your calorie and nutrient needs.

If you can incorporate it into a healthy pattern of time-restricted eating and low-carb nutrition, you may be well on your way to achieving your health and weight goals.

Remember, We only suggest this one meal a day diet if you build up to it slowly. Take your time with intermittent fasting and gradually increase the amount of time you fast daily. Only once you’ve let your body adjust to fasting can you fast for 23 hours per day successfully.

For more recipes: Click here

If you are facing issues in dropping your weight, please take this free-body type assessment: Click here

How to make Kashmiri Goshtaba

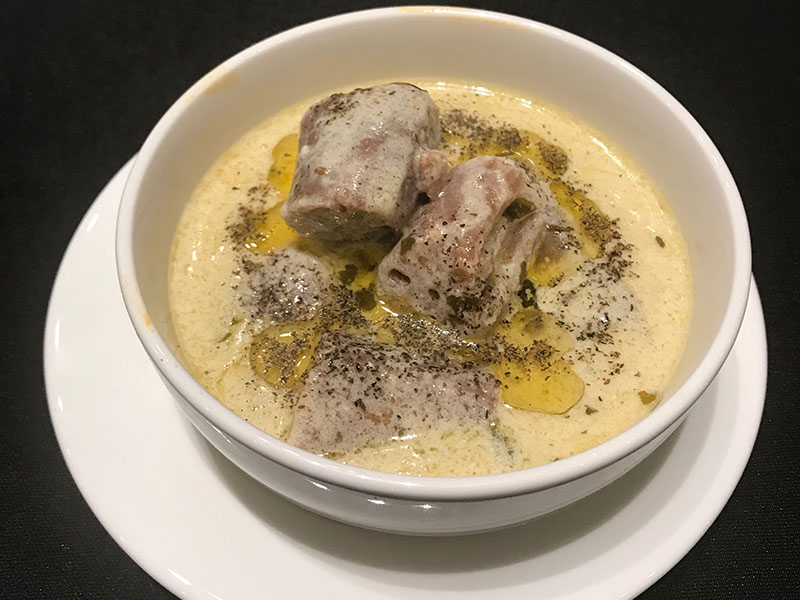
Goshtaba’ or gostaba is a flavorsome dish made from minced mutton meatballs in a curd-based gravy. This traditional dish is full of authentic Kashmiri flavors. It is so good that it’ll leave you wanting for more.This traditional dish is full of authentic Kashmiri flavors.

If you have been to Kashmir and tried this dish, you probably know why it is so special. And if not, you should still definitely try it out at home. You can also try Kashmiri haak, Lyodur Tschman

So here we come with an authentic recipe of Kashmiri Goshtaba in easy steps.

INGREDIENTS

  • For Making balls, mutton minced 500 gms
  • Mutton Fat 100 gms OR You can use 2 eggs
  • Green Cardamom 4 nos
  • Salt 1/2 tsp
  • Chilled Water 2 cups
  • Mutton Stock 1 litre

FOR MAKING GRAVY

  • Curd 750 gms
  • Water 1/2 litre
  • Green cardamom ,crushed 3 nos
  • Cinnamon Stick 1 nos
  • Fennel Powder 1 tbsp
  • Dry Ginger Powder 1 tsp
  • Nicely Chopped Garlic 3 nos
  • Dry Mint Leaves 1 tbsp
  • Pure Ghee 2 tbsp
  • Brown Onion paste 1 tbsp
  • Salt or as per taste 1 tsp
  • For Garnish,Brown Onion Slice 1 tsp
  • Kesar Strings 3-4 nos
  • Fresh Mint Leaves 6-8 nos

METHOD

  • Dip the mutton fat in chilled water and keep aside. And if you are using eggs, then don’t use mutton fat and chilled water, Just minced the meat and add eggs into it.
  • Take the minced mutton on chopping board add green cardamom seeds and salt and continue mince add gradually chilled water mutton fat also (squeeze out water) minced till soft and creame
  • Boil mutton stock in a pot now switch of gas, cover it and keep aside it
  • Now make balls of mutton mince and drop on hot mutton stock
  • Take curd in another pan and whisked well not even lumps in this
  • Now add salt, green cardamom seeds and cinnamon stick and keep on gas to cook
  • Once boil in curd mixture add mutton balls in it from Mutton stock
  • Now add nicely chopped garlic, fennel and dry ginger powder in a bowl and seive this and add this mixture in curd mixture and cook
  • After a minute add brown onion paste in this
  • Cook untill required consistency of shorba
  • Now add dry mint leaves Powder in it mix and cook
  • Heat ghee in other pan and add this in curd mixture carefully.
  • Now Kashmiri Goshtaba is ready to serve
  • At time to serve, sprinkle some kesar strings, brown onion slice and mint leaves over the top
  • Serve hot with Kashmiri zafraan rice or Naan

For more recipes: Click here

If you are facing issues in dropping your weight, please take this free-body type assessment: Click here

How to make Nadru Yakhni in easy steps

Nadru Yakhni Recipe is the Lotus Stem in the pool of Yogurt and spices. Lotus roots/stem is very popular in Kashmiri cuisine. They are also called as Nandru or kamal kakdi. Lotus stem is used as an alternative for meat in most vegetarian cuisines.

There are many health benefits of LOTUS STEM aka NADRU like Lotus stem is a great source of Vitamin C, which helps boost the immunity of a person and fight viral infections. The root also contains essential minerals like zinc, magnesium, copper and iron, which help the body in the production of red blood cells.

Kashmiri cuisine uses cinnamon, black cardamom, green cardamom, cloves, saffron, saunf, and curd (yogurt) widely in their cuisine. Kashmiri red chilies are the other essential ingredient, this chili gives a nice vibrant color, but is not pungent at all. Lets start with our recipe..

INGREDIENTS

  • 1-2 cups Nadru (Lotus Root), sliced
  • 1 tbsp mustard oil
  • One tbsp ghee
  • 1 cup Curd/Yoghurt
  • 1-2 green chilies, slit
  • 1-2′ cinnamon stick
  • 2-3 green cardamoms
  • 5-6 cloves
  • 1/2 tsp. cumin seeds
  • 1/4 tsp. asafoetida
  • 2 tsp. ginger powder
  • 1 tsp. cumin powder
  • 2 tsp. fennel powder
  • 1/2 tsp. cardamom powder
  • 1/2 tsp. garam masala powder
  • 1 tsp. salt or to taste

METHOD

  1. Wash and scrape the lotus steams and then slice them thinly.
  2. Soak them in luke warm water for 20 minute to loosen any mud and dirt inside the holes and then wash well.
  3. Heat 1 tbsp mustard oil and saute the nadru (lotus root) till they are slightly browned. Drain and keep aside.
  4. Now pressure cook the fried nadru in 1 cup water, salt to taste, half of the cardamom powder, half of the fennel powder and half of the ginger for 4-5 whistles.
  5. Heat ghee in a pan and temper with cumin seeds, green chilies, cinnamon, cardamoms, cloves, remaining ginger and asafoetida. Saute for a few seconds.
  6. Beat the yoghurt, so that no lumps should be present.
  7. Add the yoghurt, salt and all the remaining dry spices. Stir for 2-3 minutes on a low flame. Pour the boiled nadru and the chickpea flour mixed in 1/2 cup water
  8. Cook for 2 minutes and add chopped fresh coriander.
  9. Serve hot with steamed rice,naan or roti’s.

You can also try our other kashmiri recipes like Paneer Chaman, Kashmiri Haak, Lyodur Tschman

For more recipes: Click here

If you are facing issues in dropping your weight, please take this free-body type assessment: Click here

20 mins easy recipe for Kashmiri Paneer Chaman

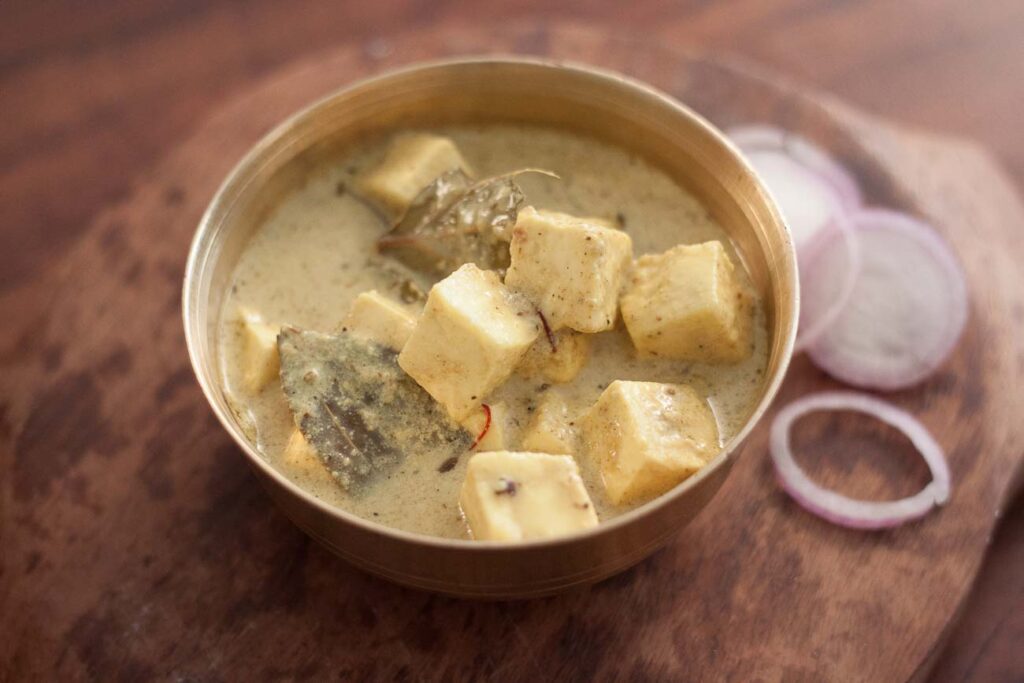
Paneer Chaman is a delicious Kashmiri recipe that can be made on days you want to try a paneer dish with a twist. This is basically a fennel scented paneer dish. If you are done with buttery paneer recipes, than try out this light and tasty Paneer Chaman recipe. It also had a lovely taste of Mustard oil and cloves. You might not believe it before trying it, but this delicacy can make you forget your favourite meats and curries.

Lets come over to our easy yet delightful recipe.. A delectable blend of spices, milk and paneer, the creamy texture of this dish will get you hooked!

Ingredients

  • 500 grams Paneer
  • 2 tbsp Mustard oil 
  • 2 to 3 Saffron strands
  • 1 Bay leaf (tej patta)
  • 1 Cinnamon Stick (Dalchini)
  • 4 Cloves (Laung)
  • 1 cup Milk
  • 4 cups Water
  • 1 teaspoon Cumin powder (Jeera)
  • 3 tablespoons Fennel Powder
  • Salt , to taste
  • 1 teaspoon Cardamom Powder (Elaichi)

How to make Kashmiri Paneer Chaman

  1. To begin making the Kashmiri Style Chaman Recipe, firstly heat oil in a wok/kadai and add bay leaf, cinnamon and cloves.
  2. Add water to the pan and as it comes to boil, add turmeric powder, cinnamon powder, salt and fennel powder and mix.
  3. Let the gravy boil and reduced a little. Now add paneer pieces and cook till paneer turns soft and the curry starts to thicken.
  4. Add 1 cup of whole fat milk and saffron, stir well and cook till required consistency.
  5. Now add cardamom powder and turn off the gas.
  6. Paneer chaman is ready to serve.
  7. Serve Kashmiri Style Chaman Recipe with Pulao or Roti for a nice lunch.

You can also try our kashmiri Haak recipe

For more recipes: Click here

If you are facing issues in dropping your weight, please take this free-body type assessment: Click here

How to make Authentic Kashmiri Haak Saag

Kashmiri haak is a typically cooked with mustard oil, asafoetida (hing), and dried red chilies. It is cooked in almost all Kashmiri homes specially in winters.

Haak is the Kashmiri equivalent of saag or greens. Kashmiri style haak is a traditional dish made with a variety of greens like haak, monji haak (kohlrabi greens), mujj haak (radish greens), and vopal haak (dandelion greens). Other greens that can be used include collard greens, kale, beet greens, spinach, and cabbage (the outer, darker leaves).The best Kashmiri haak is simple and light, healthy and nutritious, tasty and flavourful.

This dish of soupy braised greens is considered a poor man’s food because it uses leaves from vegetables that would otherwise be discarded. Nevertheless, delicious Kashmiri haak is an integral part of the menu for all major events and festivals in Kashmir.

In this recipe we will use Collard Green to make Haak. You can also try our recipe for Chicken Yakhani

How to eat Kashmiri Haak –

People in Kasmir eat Haak basically with rice. The soupy Saag is ladle on the middle of a plateful of rice. They also add extra mustard oil over the haak to enhance both flavour and taste.

INGREDIENTS

  1. 1Kg Haak Saag/Collard Greens – Can also use Palak if Collard is not available
  2. 1/4 cup Mustard oil (Sarson k tel)
  3. 1/8 tsp heeng
  4. 4-5 Kashmiri Chillies
  5. 10 Garlic cloves
  6. Salt as per taste
  7. 4 cups water

METHOD

  1. Clean and Wash Haak Saag Very well.
  2. Pour Mustard Oil in a pressure cooker . Add Garlic cloves and saute till it comes light brown.
  3. Now Pour water into the pressure cooker over high heat. Bring to a boil
  4. Toss in salt and Heeng, Red chilles (You can also use green chillies). stir till completely dissolved. Bring the water back to a boil and continue to press down with a spatula or large spoon. It is important that the haak stays submerged in the water. Then Pack the pressure cooker for 10-15 Minutes, till the haak is tender and cooked through.
  5. . Remove from heat.
  6.  Transfer haak to a serving bowl along with its cooking liquid. Eat hot ladled over rice.

For more recipes: Click here

If you are facing issues in dropping your weight, please take this free-body type assessment: Click here