Healthy Recipes

All healthy recipes are under this category. Try at your convenience.

Healthy eating means eating a variety of foods that give you the nutrients you need to maintain your health, feel good, and have energy.


These nutrients include protein, carbohydrates, fat, water, vitamins, and minerals. A healthy diet is essential for good health and nutrition.

It protects you against many chronic non-communicable diseases, such as heart disease, diabetes, and cancer. It can also boost a person’s mood and provide them with more energy.


A doctor or dietitian can provide tips on eating a more healthful diet.  If you take care of yourself, you can keep your cholesterol and blood pressure within a safe range.

This keeps your blood flowing smoothly, decreasing your risk of cardiovascular diseases.


Eating a variety of foods and consuming less salt, sugars, and saturated and industrially-produced trans-fats, are essential for a healthy diet

Healthy  Recipes foods nourish us with vitamins, minerals, protein, fiber, and healthy fat.


So, healthy recipes are made up of vegetables, fruits, whole grains, lean meats, legumes, low-fat or fat-free dairy, and healthy fats.

It’s a combination of these foods that give us the most nutritional bang for our caloric buck. Nutrition is important for everyone.


When combined with being physically active and maintaining a healthy weight, eating well is an excellent way to help your body stay strong and healthy.


Having foods & drink that are high in fat, sugar & salt have these often & in small amounts.

Nutritious recipes can include butter and sugar, just like healthy meals can include an indulgent dessert—

it’s all about moderation and the big picture.


How to make Keto Rasmalai

Keto Rasmalai ? Yes you are right we are talking about rasmalai. Next question in your mind would be how’s that possible? Well, we are sure on the Keto diet, you are missing appealing desserts. So here we bring this amazing recipe of Keto Rasmalai.

Rasmalai is one of the most loved sweets in Indian weddings, parties, and festivals. Rasmalai is basically sweetened cheese added to sweetened and flavored milk and serve chilled.

The keto version of your favorite tries best to match up with the original version. And can be made easily at home for your special occasions and festivals. Lets try out this yummy recipe. You can also try our Keto halwa recipe.

INGREDIENTS

  • 1 Litre Milk high fat
  • 2 ½ tbsps white vinegar or lemon juice

For Sugar syrup:

  • 1-1.5 liters water
  • 5-6 tbsps Erythritol + Monk fruit blend (or sweetener of your choice) Adjust according to your sweetener

For the Rabri:

  • 500ml unsweetened almond coconut milk or plain almond milk
  • ¼  cup table cream
  • 4 tbsp  Erythritol + Monk fruit blend (or sweetener  of your choice) Adjust according to your sweetener
  • 4 cardamom pods lightly crushed
  • ¼  tsp almond extract
  • 2-3 strands Saffron or 1/8th  tsp of yellow food coloring
  • 4-5 almonds chopped/crushed

METHOD

To make Chenna/Paneer Discs:
  • Bring your milk to a boil turn off the flame and add lemon juice and stir as the milk separates.
  • Once separated, put in the paneer and whey, into a strainer/colander lined with a cheese or muslin cloth.
  • Gently press out the liquid.
  • Try and hang it from your kitchen sink tap to drip the rest of the whey for about 20minutes.
  • Put the paneer on a plate or clean surface and start rubbing it really well to bring the crumbles together into a nice soft dough ball. This will require at least 10 minutes of  rubbing. This is a very vital move for a soft and spongy chenna disc so don’t stop ahead of the 10minutes.
  • Once done, make the individual balls out of the dough and flatten them into discs, they don’t need to be perfect the next step will even them out, and also this dish is quite forgiving. Set aside.
For Sugar Syrup:
  • Add water and sweetener to the vessel.
  • Taste to make sure it\’s not just watery sugar syrup and adjust your sweetener accordingly.
  • Bring the syrup to a boil
  • Add discs to the syrup, cover, and cook for about 15minutes. Check on them.
  • Once they have doubled in size,  use a slotted spoon to gently remove them from the syrup. Before discarding them, take a wooden spoon to Gently press the excess syrup out of the discs before setting down in a wide dish or bowl.
For Rabri:
  • Add the cream, almond milk, and sweetener to a heavy-bottomed saucepan with cardamon and saffron ( if available).
  • If using food color save it for later.
  • Bring the milk to a boil and add the almond extract (optional) and color if that what you are using.
  • Taste and adjust the sweetness to your liking.
  • Turn off the flame, let it cool for about 4-5minutes and when it\’s still warm pour the Rabri all over the discs.
  • You want the discs to really soak and absorb all that yummy milk.
  • Top with your almonds.
  • Refrigerate overnight.

Your Keto Rasmalai is ready to serve 🙂

If you are struggling shedding weight. You can talk to us by taking this assessment: Click here

For more information click here

How to make Keto Rasmalai Read More »

Easy steps of making Keto Cheesy Cauliflower Bread

Cheesy Cauliflower Bread is easy, cheesy, and made with healthy veggies instead of wheat. The perfect alternative to bread, they’re gluten free and absolutely delicious!

These cauliflower breadsticks are never going to taste exactly like ‘real’ bread, but they hit the spot, make you feel good about what you are eating and feeding my family, and they’re definitely still delicious!

Brushed with a bit of garlic butter and sprinkled with cheese, these are perfect for dipping in marinara, Keto ketchup or keto chutney.

INGREDIENTS

For the breadsticks:

  • 1 medium head cauliflower
  • ½ cup shredded mozzarella
  • ¼ cup grated Parmesan cheese
  • 2 large eggs, beaten
  • 2 tablespoons Almond or coconut flour
  • 1/2 teaspoon garlic powder

For topping:

  • 3 tablespoons melted butter
  • 2 cloves minced garlic
  • 1 teaspoon onion powder
  • ½ teaspoon garlic powder
  • 1 cup shredded mozzarella
  • Parsley or basil, for garnish

Instructions

  1. Chop the cauliflower into florets and add to the bowl of a food processor. Process until you have small rice like pieces.
  2. Steam, boil, or microwave cauliflower until very tender, about 5 minutes. 
  3. Let the cauliflower cool for 20 minutes and then dump into a clean tea towel. While cauliflower is cooling, preheat oven to 400 degrees. Fold the towel up over the cauliflower and squeeze out any excess moisture. Keep squeezing until no liquid is left in the cauliflower.
  4. Transfer cauliflower to a mixing bowl and add the remaining ingredients for the crust. Stir well to combine.
  5. Line a sheet pan with parchment paper and press the dough out to form a 10×6 inch rectangle about ¼ inch thick. 
  6. Stir together the butter, garlic, onion powder, and garlic powder to make the topping. Brush it over the top of the breadsticks.
  7. Bake for 20 minutes or until the dough is golden brown. 
  8. Remove from the oven and top with the cheese and bake for 5 minutes to melt the cheese. Broil to brown the cheese on top, if preferred.
  9. Sprinkle with parsley and allow to cool 5 minutes.
  10. Slice into breadsticks and serve.

Taddaaaa…Your cheesy cauliflower bread is ready!!

TIP

Removing as much liquid from the cauliflower as possible is very important or your breadsticks will not turn out properly. Keep squeezing out the moisture until the cauliflower looks dry.

You can also try our other keto recipe like Creamy butter mushrooms, Keto zucchini bread, Keto Biryani

For more recipes: Click here

If you are facing issues in dropping your weight, please take this free-body type assessment: Click here

Easy steps of making Keto Cheesy Cauliflower Bread Read More »

How to make Keto Chicken Biryani

Keto Chicken Biryani!! Yes you heard it correct in this article we will laern about keto chicken biryani. Cauliflower and ground chicken make up this spicy, delicious low carb recipe.

This biryani tastes as good as the normal rice chicken biryani. It can satiate your craving for a regular biryani, this takes care of your craving. So yeah. It’s not as good as biryani with rice, but for something that uses chicken and cauliflower rice instead of rice, I’m surprised at how well it hits the spot for biryani. lets begin with the recipe.

INGREDIENTS

For Chicken

  • 1 teaspoon Ghee
  • 500gm Ground Chicken or small Pieces
  • 1 teaspoon Salt
  • 1/2 teaspoon Turmeric
  • 1 teaspoon Garam Masala
  • 1/2 teaspoon Ground Coriander
  • 1/4 teaspoon Ground Cumin

Vegetables

  • 1 teaspoon Ghee
  • 1 Onion chopped, sliced thin
  • Green or Yellow Peppers, diced
  • 1 teaspoon ginger garlic paste, (or 1/2 teaspoons minced garlic, 1/2 teaspoons minced ginger)
  • 1/2 cup Water
  • 1/2 cup coriander, chopped
  • 1/4 cup mint leaves, chopped
  • 2 cups Cauliflower, riced

METHOD

  • Heat a 10-inch deep pan or skillet and add ghee.
  • Add the onions, cooking until they brown at the edges, about 10 minutes.
  • Add the ginger garlic paste and the peppers , and cook for a minute or two.
  • Put in the ground chicken, break up clumps and cook until chicken is no longer raw. Once it releases water, add in all the spices and mix very well. Keep cooking until the water evaporates, and the spices are well-mixed in.
  • Use 1/2 cup of water to deglaze the pan, scraping up the bits of brown from the bottom.
  • Add in chopped coriander and mint, and the uncooked riced cauliflower.
  • Mix everything very well and cover with a lid.
  • Turn the stove on low and let all of it simmer slowly together for the flavors to meld, and the cauliflower to cook slightly. Your goal is to let the cauliflower cook a little without getting mushy.
  • Taste and add salt as needed. And your biryani is ready to serve.

You can also try our other keto recipe like Creamy butter mushrooms, Keto zucchini bread

For more recipes: Click here

If you are facing issues in dropping your weight, please take this free-body type assessment: Click here

How to make Keto Chicken Biryani Read More »

How to make easy Zucchini Grilled Cheese

Zucchini Grilled cheese is a sandwich recipe which can be enjoyed by all the keto lovers. This recipe uses one of our favorite breads- zucchini bread- to make a classic grilled cheese sandwich. Not only is the bread flavorful and keto-approved, but it adds a much-needed vegetable to your meal! Zucchini is a nice, mild vegetable as well so those who aren’t huge veggie eaters will still really enjoy this sandwich.

Lets try this keto breakfast recipe. You can also try our other keto recipe like Creamy butter mushrooms

INGREDIENTS

  • 4 cups grated zucchini
  • 1 egg
  • 1/2 cup shredded mozzarella cheese
  • 4 tbsp shredded parmesan cheese
  • 1 tsp dried basil (optional, you can use oregano also)
  • 1/2 tsp salt
  • 1/4 tsp ground black pepper
  • 1/3 cup shredded cheddar cheese
  • 1 tbsp butter

METHOD

  1. Preheat your oven to 450 degrees F and line a flat sheet tray with greased parchment paper or a silicone baking mat.
  2. Add the zucchini to a medium sized microwave safe bowl and then microwave for 6 minutes. Allow to cool completely and then place the cooked zucchini on a towel or piece of cheesecloth and squeeze out all the moisture- you should see almost a cup of water come out. Get the zucchini as dry as possible as this will help with the bread.
  3. In a new bowl, mix the dried zucchini, egg, mozzarella, parmesan, basil, salt and pepper. Stir well to combine.
  4. Scoop the batter onto the prepared sheet tray into 4 and shape the zucchini into squares the size of a piece of bread.
  5. Bake the zucchini bread slices in the preheated oven for 20 minutes. The tops should be golden brown. Remove from the oven and let cool for at least 10 minutes. Once cool, carefully remove from the sheet tray and move to a plate.
  6. Sprinkle two of the zucchini bread slices with the cheddar cheese and then top with the other slices of bread, making two sandwiches.
  7. Place the butter in a medium sauté pan and melt over medium heat. Place both sandwiches in the pan and sear on one side for 4 minutes, flip and cook for another 4 minutes.
  8. Serve while hot and melty!

For more recipes: Click here

If you are facing issues in dropping your weight, please take this free-body type assessment: Click here

How to make easy Zucchini Grilled Cheese Read More »

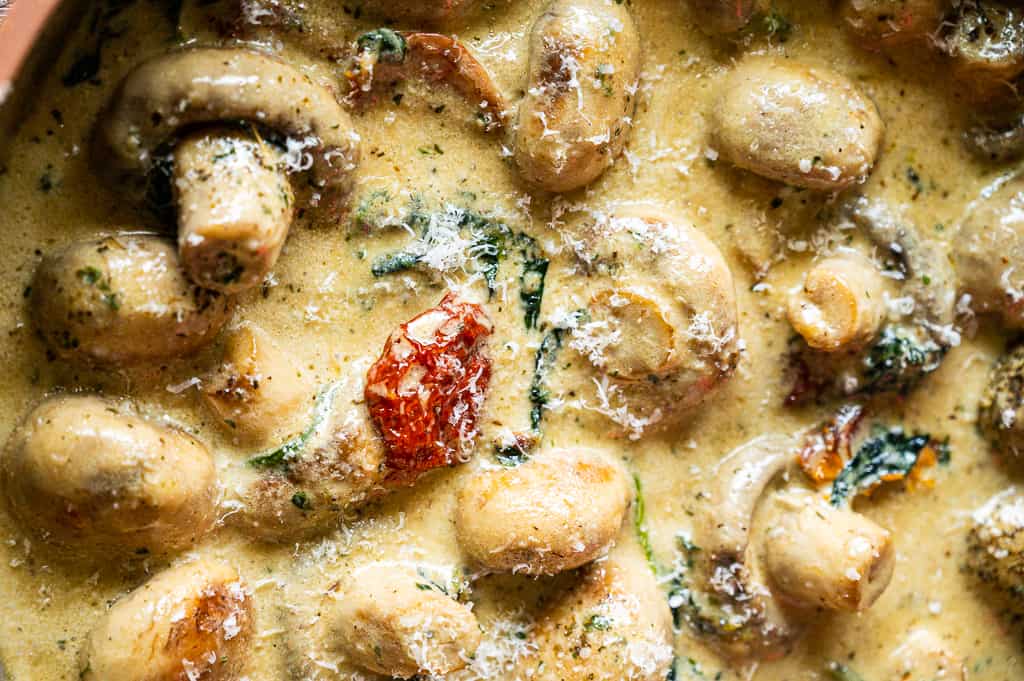
How to make keto garlic butter mushrooms

Garlic butter mushrooms is the perfect keto-friendly side dish which can be prepared under 20 minutes. Serve with your favorite meats, including steak & chicken, and enjoy this delicious dish at only 6 net carbs per serving! The Creamy Keto Garlic butter Mushrooms are a savory side dish that you can eat while following the keto diet. Follow this recipe to enhance the taste of mushrooms with flavorful ingredients, including cream cheese, minced garlic, and butter.

Try our other low carb keto recipe as well keto samosa, keto parmesan chicken, keto creamy brussels

INGREDIENTS

  • 16 baby Button mushrooms cleaned and trimmed
  • 2 tbsp unsalted butter
  • 2 tbsp garlic, minced
  • 1 cup heavy cream
  • 2 tbsp cream cheese
  • 1/4 cup parmesan cheese
  • 1/2 tsp dried oregano
  •  dried thyme as per taste
  • 1/2 tsp ground pepper
  • salt to taste
  • parsely, to garnish optional

METHOD

  • Heat a large skillet; add butter on a medium heat. 
  • Once the butter has melted add the minced garlic and fry them for 1 minute until a nice aroma comes.
  • Add the cleaned mushrooms and saute for 4-5 minutes until tender and coated with butter sauce.
  • Stir in the heavy cream, cream cheese, salt, pepper, dried oregano and thyme. Close with lid and cook for 5 minutes until the sauce thickens.
  • Finally add the parmesan cheese and simmer the sauce for a minute.
  • Add some chopped fresh parsley and transfer the creamy garlic mushrooms to a bowl and serve.

For more recipes: Click here

If you are facing issues in dropping your weight, please take this free-body type assessment: Click here

How to make keto garlic butter mushrooms Read More »

Easy recipe of Creamed Brussels Sprouts

Creamed Brussels sprouts with garlic and parmesan is an easy and tender recipe. The perfect comfort food. At just 5.2g net carbs per serving these keto Brussels sprouts are keto-friendly and a sure fire way to eat more green vegetables.

You’ll find that creamed Brussels sprouts are usually served during the fall and winter months, as that’s typically when Brussels are in season. It’s the perfect side dish for chicken and other winter warmer dinners.

INGREDIENTS

  • 500gm Brussels sprouts
  • 1 tablespoon butter
  • ⅓ cup (80 ml) heavy whipping cream
  • 55 g cream cheese softened
  • ½ cup pre-shredded/grated mozzarella
  • 1 clove garlic minced
  • 1 teaspoon mustard sauce
  • salt and pepper to taste
  • 2 tablespoon parmesan cheese

METHOD

  • Pre-heat your oven to 190°C/375°F. Remove the stems and loose leaves from your Brussels sprouts. Then cut then in half.
  • Next, melt the butter in a cast-iron skillet or another oven-safe skillet over medium-high heat on the stove. When the butter is melted mix in all the remaining ingredients except the parmesan cheese and Brussels sprouts.Mix until all the cheese has melted and the sauce is smooth and creamy.
  • Toss the Brussels sprouts in the cheese sauce until they are completely coated. Sprinkle the parmesan cheese over the top then place the whole skillet in the oven.
  • Cook uncovered on the middle rack for 15-20 minutes or until the sprouts are tender and the top is a golden brown. Remove from the oven and serve.

For more recipes: Click here

If you are facing issues in dropping your weight, please take this free-body type assessment: Click here

Easy recipe of Creamed Brussels Sprouts Read More »

How to make Keto Parmesan Chicken

Keto parmesan chicken is a super and tasty dish for keto diet followers because of how crispy and flavorful it is. You can enjoy it on a salad too. It tastes like something you would order from a fine Italian restaurant without the expenses price tag.

The secret to the delicious “Italian” flavor, crispy crust and gorgeous color is (obviously) parmesan cheese. The cheese adheres to the chicken and when melted in the pan, gives the chicken a beautiful golden and crispy crust that is to die for. Lets start our recipe of keto parmesan chicken.

you can also try our other keto recipe like keto fish, easy keto chicken recipes, keto nuggets

INGREDIENTS

  • 500gm chicken breasts 2-3 chicken breasts
  • 1 teaspoon Italian seasoning or seasoning of choice
  • 1/2 teaspoon garlic powder
  • Pinch of salt and pepper
  • 1 cup grated or zested parmesan cheese
  • 1/2 cup almond flour 
  • 2 eggs
  • 3 tablespoons olive oil or butter or oil of choice

METHOD

  • Lay the chicken breasts out on a cutting board and cut in half horizontally. Generously season with Italian seasoning (or seasoning of choice), garlic powder, salt, and pepper; Set aside.
  • Combine the parmesan cheese and almond flour in a medium shallow bowl. In another bowl, whisk the eggs.
  • Dip the chicken breasts into the egg mixture then into the parmesan mixture. shake off the excess breading. Repeat until all the chicken cutlets are covered.
  • Heat oil or butter in a large NON-STICK heavy duty pan. Add chicken cutlets in a single layer and cook for 5-6 minutes on each side, until golden and crispy. Be sure not to flip until the parmesan is golden on the first side or it will slide off. Repeat with remaining chicken cutlets

your keto parmesan chicken is ready to serve with keto ketchup

If you are struggling shedding weight. You can talk to us by taking this assessment: Click here

For more information click here

How to make Keto Parmesan Chicken Read More »

How to make keto Thai curry

Keto Thai curry is a savior for all keto diet followers. Thai cuisines is popular amongst the entire continent. Thai curries differ from Indian curries because they are typically lighter, whereas Indian curries are traditionally thicker and more hearty.

This keto Thai coconut keto curry recipe perfectly marries the flavors of hearty red curry with light and creamy coconut milk. The additional of chicken, basil, and lime helps bolster this dish into a well-rounded low-carb meal perfect for lunch or dinner.

You can also try our other keto recipes like keto samosa, keto avocado baked chips

INGREDIENTS

  1. 1 can full-fat coconut milk or 250-200ml Homemade coconut milk
  2. 1 tsp red curry paste 
  3. 2 cloves garlic, minced 
  4. 1 lime, juiced 
  5. 2 fresh Thai chilies or normal chilies , chopped (remove seeds for less heat) 
  6. 500gm boneless, skinless chicken thighs, flattened OR 250gm paneer/tofu
  7. 1 tbsp coconut oil
  8.  ½ red bell pepper, cut into strips 
  9. 1- 1/2 yellow or green bell pepper, cut into strips 
  10. ½ cup chicken stock
  11. 1 bunch fresh Thai basil or normal basil, chopped 
  12. 2 tbsp unsweetened coconut flakes or grated coconut

METHOD

  1. Marinate the chicken: Shake the can of coconut milk vigorously or Use fresh homemade coconut milk. In a mixing bowl, whisk together ¼ cup of the coconut milk, the red curry paste, garlic, lime juice, and Thai chilies. Add the chicken and toss to coat. Allow to marinate for 5 minutes.
  2. Make the curry: In a large sauté pan, heat 1 tablespoon of coconut oil over medium-high heat, then add the bell peppers and sauté for 2 to 3 minutes. Put the marinated chicken and any remaining marinade in the pan and sauté for 3 to 4 minutes, then pour in the chicken stock and simmer for 5 minutes.
  3. Whisk the remaining coconut milk, half of the Thai basil, peppers and the coconut flakes into the pan and allow to simmer for about 3 minutes, until the chicken is tender.
  4. Add salt to taste, about half a teaspoon or as per taste. Give it a stir, then cover it and let the veggies and chicken cook.
  5. Thai curry is ready to serve.

You can also store leftovers in an airtight container in the refrigerator for up to 4 days.

For more information click here

If you are struggling shedding weight. You can talk to us by taking this assessment: Click here

How to make keto Thai curry Read More »

Keto fish with spring onion

Keto fish with spring onion recipe in 7 simple steps

Keto fish with spring onion is a Chinese dish, which is made with stir-fried fish with ginger and spring onion. This is a very tasty and healthy dish. The Oyster sauce used in this dish is a keto-friendly sauce because it has 2 gm net carbs per tbsp. Soy sauce is also the same. We can also make this recipe with chicken, prawns, pork, sliced beef, etc. This dish is soo flexible and versatile. If you love Chinese food then you should try this recipe. You will love it.

You can also try: Keto Avocado chips, Keto Paneer cutlets/tikki

Ingredients for keto dish with spring onion-

  1. Fish fillets- 500gm
  2. Soya sauce – 1tbsp
  3. Oyster sauce – 1tbsp
  4. Cooking sake – 1tbsp
  5. Sesame oil (toasted)- 1tsp
  6. Black pepper – ½ tsp
  1. MSG(optional) – ½ tsp
  2. Ginger – 10 gm
  3. Garlic – 10gm
  4. Spring onion – 50 gm
  5. Olive oil – 2tbsp
  6. Water – as needed

Method –

  1. Firstly, take a bowl put soya sauce, oyster sauce, cooking sake, sesame oil, pepper, and MSG in it, and mix well.
  2. Then, marinate the fish fillets.
  3. After that, heat the oil in a wok and put ginger, garlic, and spring onions white in it.
  4. Then, wait until the garlic turns brown, add fish and fry well.
  5. Then, put spring onion greens and sauté
  6. After that, add water and boil it. Then taste the sauce for seasoning, prepare the corn flour and water mixture, and add to the dish.
  7. Cook the dish until it gets thick and serve with cauliflower rice or as a soup with a spoon.

Preparation time: 10 minutes

Cooking time: 10 minutes

Total time: 20 minutes

For more recipes: Click here

If you are facing issues in dropping your weight, please take this free-body type assessment: Click here

Keto fish with spring onion recipe in 7 simple steps Read More »

Easy 15 min recipe of homemade Sukhdi

Sukhdi Recipe is also referred as Gud Papdi Recipe in India. It is very quick, authentic Gujarati sweet made with just 3 ingredients: Ghee, Wheat Flour and Jaggery(Gud). Sukhadi is very soft, melt in mouth texture.

INGREDIENTS

  • 1½ cups whole wheat flour
  • ½ cup jaggery
  • ⅔ cup ghee
  • 2 tbsp desiccated coconut (optional)

METHOD

  1. First prepare the plate to set the sukhdi. You need to grease the bottom of plate by ghee.
  2. Put ghee into large non-stick pan. And melt it on slow flame. When ghee is slightly hot (bubbles are started to form), add flour wheat flour.
  3. Stir with spatula, the mixture looks like thick paste and feels heavy while you are stirring it.
  4. Now roast the flour into ghee, if ghee is not enough to roast the flour, you can add more. First add 1 tbsp, then if you still required then add one tbsp one by one.
  5. Stir it continually on medium heat for 4-5 minutes, then slow the flame and keep starring.
  6. Now its tricky part. How you would know the flour is perfectly roasted? If The flour’s color gets darker, It gets very nice aroma and Its become lighter than before.
  7. Now turn off the gas. Let it be cool for just 1-2 minutes, not more than that. After this add jaggery, quickly mix it with flour. Add desiccated coconut if you like. Now quickly set the mixture into greased plate. And flatten the surface well.
  8. Now using knife slice it into desired shape (square or diamond). Now let it be cool completely.
  9. After it cools down completely, remove the pieces gently and serve.

Tips of making Sukhdi Recipe

  • First thing is quantity of ghee (clarified butter), you must take 2/3 amount of ghee as against flour. So if you take 1 cup flour, take 2/3 cup ghee. It helps to roast flour perfectly, and also give it melt in mouth texture to sukhdi.
  • Second point is which type of jaggery, you are using for this recipe. There are lots of varities of jaggery available in the market.
    1. If you have block of jaggery, first grate it, and take measurement according and after roasting the flour, switch of the flame, and immediately add into mixture so it mixes well with flour, and you cannot found small chunks of jaggery in sukhdi
    2. If you have organic jaggery that comes in lumpy form while you buy from market, after roasting the flour, switch of the flame, wait for 2-3 minutes. Let the mixture cool down not completely, but little, than add this kind of jaggery and mix it well. If you add jaggery at early stage then it will melt and starts to boil, result will be hard and chewy sukhdi.

For more information click here

If you are struggling shedding weight. You can talk to us by taking this assessment: Click here

Easy 15 min recipe of homemade Sukhdi Read More »