Health Tips

General health tips include tips to keep healthy & lose weight.

What is a healthy life? A life where you have no disease condition or a life where your body is doing physically good,

or a life where your mind is at peace or a life where you have a social circle and well-being?


Well to answer this question, you should analyze your life and think about what actually health is.


Health as defined by WHO as a state of complete physical, mental and social well-being and not merely the absence of disease or infirmity.

So that means, health is not only just being free of a disease condition, but in order to be healthy, one must be sound physically, mentally, and socially.


Health tips not only include what one should eat and not to eat, but it also includes the practice to attain a complete state of health.


If you are doing well physically and mentally but not consuming the required amount of nutrition that your body requires,

you will not be able to achieve your health goal to the fullest. Physical activity, mental health, social well-being, and dietary habits go hand in hand to live a healthy life.


Health tips will provide you with an outlook of how you can be healthy by putting in just a few efforts and making your health a priority.


Because if your body is in a state of health, you will be in a state of overall well-being. So choose yourself and your health over anything else!


ALMOND BUTTER

DIFFERENT TYPES OF BUTTER AT HOME

Homemade butter
Butter at home

If you’re looking for a healthy and delicious spread, homemade nut butter is a great option. With a food processor or high-speed blender, you can easily make your own nut butter using your favorite nuts, such as almonds, cashews, or peanuts. By making it at home, you have control over the ingredients and can customize the flavor to your liking.

Peanut butter
Peanut butter

PEANUT BUTTER

Peanut butter is a popular food spread made from ground peanuts. It is one of the most popular spreads in the world. It is also a good source of fiber and is low in carbohydrates.

Making your own allows you to have control over the ingredients and ensures that no added sugars, oils, or preservatives are present. Additionally, homemade can help you save money, as peanuts are often less expensive.

Besides being a tasty and nutritious food, research has shown that eating peanut butter may help reduce the risk of heart disease, lower blood sugar levels, and even promote weight loss when consumed in moderation as part of a healthy diet.

People make peanut butter from ground peanuts, and it has become a popular food spread. Many households consider it a staple, and it often appears as a sandwich filling or an ingredient in recipes like cookies, cakes, and smoothies.

Making it at home is a simple and delicious way to enjoy the taste and health benefits of peanuts. Try it out and see how easy and rewarding it is to make your own nut butter at home!

You can also try- /kale-and-peanut-salad-recipe-/

INGREDIENTS

  • 2 cups roasted unsalted peanuts
  • 1-2 tablespoons honey /Stevia/Erythritol(optional)
  • (Optional): 1/2 teaspoon salt

METHOD

  • Roast the peanut.
  • Place the peanuts in a food processor or blender.
  • Pulse the peanuts a few times to break them up.
  • Blend the peanuts continuously for 1-2 minutes until they begin to form a paste.
  • Add salt and honey, if desired, and blend again until the mixture is well combined.
  • Taste the peanut butter and adjust the salt and honey as needed.
  • Transfer the peanut butter to a jar with a lid and store it in the refrigerator for up to 2 weeks.

Enjoy your homemade peanut butter on toast, in smoothies, or as a dip for fruits and vegetables!
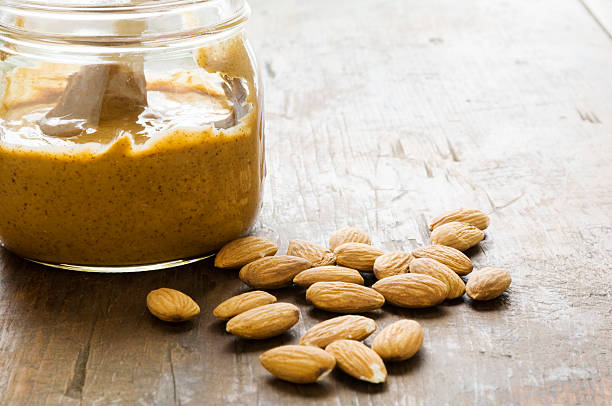
ALMOND BUTTER

ALMOND BUTTER
Jar of homemade almond butter.

Making almond butter at home is an easy and quick way to enjoy a delicious and healthy alternative to traditional peanut butter. In fact, almond butter is packed with protein, healthy fats, and nutrients that can help improve your overall health.

Additionally, the good news is that you can make almond butter at home easily and quickly with just a few simple ingredients.

So why not give it a try and see how much you enjoy it

INGREDIENTS

  • 2 cups raw almonds
  • 1/4 teaspoon salt (optional)
  • 1-2 tablespoons neutral oil (such as vegetable or grapeseed oil, optional)

METHODS

  • Roast 2 cups of raw almonds in the oven.
  • Blend the roasted almonds in a food processor for 8-10 minutes until it becomes smooth and creamy.
  • Add salt and/or neutral oil to the almond butter, if desired.
  • Transfer the almond butter to a clean container with a lid.
  • Store in the refrigerator for up to 2-3 weeks.

CASHEW BUTTER

Jar of homemade almond butter.

Cashew butter is an alternative to peanut butter for people who are allergic to peanuts because it has a creamy and rich flavor. Also, it is a good source of protein, healthy fats, magnesium, and copper.

People can use cashew butter in various ways, like adding it to smoothies, baked goods, or savory dishes like curries and stir-fries. In fact, it is commonly used instead of dairy butter or heavy cream in vegan recipes.

INGREDIENTS

2 cups raw / roasted almond

1-2 tablespoons neutral oil (such as vegetable or coconut oil optional)

METHODS

  • Firstly, gather the necessary ingredients, such as raw or roasted cashews, salt, and optional oil.
  • Next, add the cashews to a high-speed blender and blend them until they become a fine powder.
  • Then, keep blending until the cashews release their natural oils and form a smooth, creamy paste.
  • If the mixture seems dry, add a little oil, such as coconut or vegetable oil, to help it blend more easily.
  • After that, add salt to taste and blend again to combine the flavors.
  • Finally, transfer the cashew butter to a jar or airtight container and store it in the fridge.

To enjoy your delicious and creamy homemade cashew butter, spread it on toast, blend it in smoothies, or use it as a dip for fruits and vegetables.

For more recipes: Click here

If you are facing issues in dropping your weight, please take this free-body type assessment: Click here

Multigrain dosa

How to make multigrain dosa at home?

Multigrain dosa is an Indian pancake made from a combination of different grains such as rice, wheat, millet, and lentils.

In addition, this versatile dish can be enjoyed in various ways. For instance, you can serve it with a variety of accompaniments such as chutney, sambar, or any other spicy side dish of your choice. Whether you prefer it as a light meal or snack, multigrain dosa is a great option for any time of the day

Overall, multigrain dosa is a delicious and nutritious dish that you can easily prepare at home with simple ingredients and basic cooking equipment

Ingredients:

Urad dal-1\4 cup

1/4 cup Moong beans

1/4 cup Chana dal

1\4 Toor dal

1\4 Masoor dal

Sago 1\4 cup

Rice 1\4 cup

Moong dal 1\4 cup

Fenugreek seeds- 1 tsp

Green chillie-3

Ginger-2 tsp chopped

Cumin seeds-1 tsp

Salt to taste

Water as required

Oil for cooking

Instruction required for making multigrain dosa

To make multigrain dosa at home, follow these steps:

  1. In a mixing bowl, add all the pulses, rice, and sago. Wash and soak them in water for 4-5 hours.
  2. After soaking, drain the water and grind the mixture to a smooth paste. Gradually add water while grinding to achieve the desired consistency.
  3. Once the batter is smooth, add salt to taste and mix well until the batter has a pouring consistency.
  4. Preheat a tawa or non-stick pan on medium heat.
  5. Take a ladle full of batter and pour it onto the center of the tawa. Then, using the back of the ladle, spread the batter in a circular motion to form a thin layer.
  6. Drizzle some oil or ghee on top of the dosa and let it cook for a few minutes until the edges start to turn brown.
  7. Carefully flip the dosa over and cook for another minute or two on the other side.
  8. Once the dosa is cooked on both sides, remove it from the tawa and repeat the same process for the remaining batter
  9. Serve the multigrain dosa hot with your favorite chutney or sambar.

You can also try: Chinese dosa and Palak paneer dosa.

For more recipes: Click here

If you are facing issues in dropping your weight, please take this free-body type assessment: Click here

How to make rice Khichu at home

Rice Khichu is a popular and traditional Gujarati snack that people make from rice flour. It is an easy-to-make and simple dish that people often enjoy as a breakfast item or as an evening snack.

Rice Khichu has a soft and chewy texture with a slightly spicy and savory flavor. People usually serve it hot and garnish it with a drizzle of oil and some grated coconut on top.

Apart from being a delicious snack, Rice Khichu is also a healthy option because it is gluten-free and does not contain any artificial preservatives or additives.

Additionally, it provides energy to the body as it is a great source of carbohydrates.

Ingredients:

1 cup rice flour

2 cups water

1 teaspoon grated ginger

One teaspoon cumin seeds

1 teaspoon sesame seeds

One teaspoon green chili paste

1 teaspoon sugar

Salt to taste

1 tablespoon oil

You can also try:  Banana yogurt smoothie, herb rice with paneer manchurian, how-to-make-soya-matar-keema.

Instruction to make rice khichu

Firstly, boil 2 cups of water in a pan.

Next, add cumin seeds, sesame seeds, grated ginger, green chili paste, sugar, salt, and oil to the water and mix well. Let it simmer for 2-3 minutes.

While stirring continuously, gradually add 1 cup of rice flour to the mixture to prevent lumps from forming.

Keep stirring and cooking the mixture on low heat for 5-7 minutes or until it forms a smooth dough.

After that, take it off the heat and let it cool for a few minutes.

Once the dough is cool enough to handle, knead it well to make it smooth.

Divide the dough into small portions and shape them into balls.

Flatten the balls slightly with your fingers to form discs.

Then, place the discs on a steamer basket and steam them for 10-12 minutes or until they are fully cooked.

Finally, serve hot by drizzling oil and grated coconut on top.

If you are struggling shedding weight. You can talk to us by taking this assessment: Click here

For more information click here

Ghugni sabzi

How to make Ghugni sabzi

Ghugni sabzi is quite a popular street food in Calcutta city. Every corner of the street will have ghugni sabzi or jhala muri and both of them have something in common, that is called Muri Masala. Muri masala is a blend of roasted condiments and spices as well. Ghugni sabzi consist of a special masala termed as moodi masala.

Ingrediants-

1 cup Dried Yellow/White Peas (Vatana), soaked for 4 hours or overnight.

one- inch Ginger, grated

1/2 teaspoon Kalonji (Onion Nigella Seeds)

1/4 teaspoon Turmeric powder (Haldi)

For Serving

1 Lemon, to be used when serving

2 Green Chillies, finely chopped

3 inch Ginger, thinly sliced

Three sprig Coriander (Dhania) Leaves, finely chopped

Salt, to taste

Muri Masala (makes 1 cup approximately)

1/4 cup Cumin seeds (Jeera)

One-fourth cup of Coriander (Dhania) Seeds

1/8 cup Rock Salt

One-eighth cup, White pepper powder

 Amchur (Dry Mango Powder)- 1/8 cup

 Red Chilli powder, one-eighth cup

10 Bay leaves (tej patta)

Method-

First let’s prepare Muri Masala.

So to make muri masala, roast the cumin and coriander seeds until browned well. Keep it aside.

Further roast the bay leaves until crisp. Then combine all the roasted ingredients with the rest of the remaining ingredients and blend them into a fine powder.

Therefore one can store the Muri/Moodi Masala in the freezer to retain freshness for about 4 to 6 months.

Thus cook soaked yellow peas in the pressure cooker.

Therefore now making Ghugni is very simple.

In addition, heat a teaspoon of oil in a pan, and add ingredients such as grated ginger, turmeric powder, cooked peas and, 1 or 2 tsp moody masala. Adjust the salt as required. 

Hence give Ghugni a quick boil then add coriander leaves, stir it, and turn off the flame.

Finally add thinly sliced ginger and more green chilies on the top as a tea-time snack or lunch or dinner.  

So Serve and enjoy!

For more recipes: Click here

If you are facing issues in dropping your weight, please take this free-body type assessment: Click here

Soya matar keema

How to make soya matar keema?

Soya keema matar is a vegetarian dish that originated in the Indian subcontinent.

This dish provides a great source of nutrients, including protein, fiber, and vitamins. Soya granules are a healthier alternative to red meat and an excellent source of plant-based protein.

This dish provides a great source of nutrients, including protein, fiber, and vitamins.

In addition, green peas are rich in protein, fiber, and essential vitamins and minerals, which make them an incredibly healthy addition to any diet.

Soya keema matar is an excellent main dish when served with rice or bread.

It’s a perfect choice for vegetarians or anyone seeking a healthy and flavorful meatless option. With its rich flavor and hearty texture, it is sure to become a favorite among both vegetarians and non-vegetarians alike.

Soya matar keema is a delicious vegetarian dish made with soya granules and green peas. Here’s a recipe for you to try at home:

Ingredients required for soya matar keema

Soya granules one cup

One cup green peas (fresh or frozen)

2-3 garlic cloves, minced

1-inch ginger, grated

2-3 green chillies, chopped

1 large onion, chopped

2-3 tbsp oil

Cumin seeds 1 tsp

Bay leaf one

Cinnamon stick 1

2-3 cloves

One tsp turmeric powder

Red chilli powder 1 tsp

One tsp coriander powder

1 tsp cumin powder

One tsp garam masala powder

Salt to taste

Chopped fresh coriander leaves for garnish

You can also try:  Banana yogurt smoothie, herb rice with paneer manchurian, how-to-make-soya-matar-keema

Method to prepare

First, soak the soya granules in hot water for 10-15 minutes. Then, drain the water and squeeze out the excess moisture from the soya granules.

Now, heat oil in a pan over medium heat and add cumin seeds, bay leaf, cinnamon stick, and cloves. Saute for a minute until fragrant.

After that, sauté the chopped onion in the pan until it becomes translucent.

Sauté the chopped onion in the pan until it becomes translucent. Add minced garlic, grated ginger, and chopped green chillies and sauté for another minute.

Add green peas and sauté for a couple of minutes.

Mix the soaked soya granules well with the onion and peas mixture.

Add turmeric powder, red chilli powder, coriander powder, cumin powder, and salt, and mix everything together. Cook for 5-7 minutes.

Add garam masala powder and mix well. Now cook for another 2-3 minutes.

Garnish the dish with chopped fresh coriander leaves and serve hot with roti, naan or rice.

Finally, you can enjoy your delicious and nutritious soya matar keema.

If you are struggling shedding weight. You can talk to us by taking this assessment: Click here

For more information click here

How to make dal daliya at home?

Dal daliya is a popular and nutritious Indian dish that people make with lentils and broken wheat. It is a hearty and filling meal that is perfect for any time of the day, whether it’s breakfast, lunch, or dinner.

It’s a an excellent source of protein, fiber, and essential vitamins and minerals. People in North India often eat it as a wholesome breakfast or a light lunch.

To make the dish, people typically soak yellow moong dal (split yellow lentils) and daliya (broken wheat).Then they cook them together with aromatic spices such as cumin, mustard, and turmeric. By pressure cooking the lentils and broken wheat, they create a creamy and flavorful dish that pairs well

And since the dish is easy to prepare, and can be customized to suit individual tastes and preferences.

So, if you’re looking for a healthy and delicious meal that’s packed with nutrients and flavor, give dal daliya a try. You won’t be disappointed!

You can also try: https: how-to-make-seed-crackers-at-home, how-to-make-bread-kheer, homemade-dal-makhani-recipe-low-fat-and-delicious.

Ingredients required for dal daliya

1 cup yellow moong dal (split yellow lentils)

1/2 cup daliya (broken wheat)

1 onion, chopped

1 tomato, chopped

1 green chili, chopped

1 tsp ginger-garlic paste

1/2 tsp cumin seeds

1/2 tsp mustard seeds

1/2 tsp turmeric powder

1/2 tsp red chili powder

Salt to taste

2 tbsp oil or ghee

Fresh coriander leaves for garnishing

Instructions:

To begin with, rinse the dal and daliya in cold water and soak them separately for at least 30 minutes.

Next, heat the oil or ghee in a pressure cooker over medium heat. Add the cumin seeds and mustard seeds and let them splutter.

Then, add the chopped onion and green chili, and sauté until the onion turns translucent

After that, add the ginger-garlic paste and sauté for another minute.

Next, add the chopped tomato, turmeric powder, and red chili powder, and sauté until the tomato becomes soft and pulpy.

Once the tomato is cooked, drain the water from the soaked dal and add it to the pressure cooker. Add 3 cups of water, salt to taste, and mix well.

Drain the water from the soaked daliya and add it to the pressure cooker. Mix well.

Close the pressure cooker lid and cook for 3-4 whistles or until the dal and daliya are soft and well-cooked

Finally, let the pressure release naturally and then open the lid. Garnish with fresh coriander leaves and serve hot with chapati or rice.

Finally, enjoy your delicious and nutritious dal daliya!

If you are struggling shedding weight. You can talk to us by taking this assessment: Click here

For more information click here

How to make seed crackers at home?

Seed crackers

Seed crackers are cracker made primarily from seeds, offering a nutritious and tasty snack option.

Those with dietary restrictions often prefer them as they are gluten-free, vegan, and paleo-friendly.

Seed crackers are high in fiber, healthy fats, and protein, which make them a filling and satisfying snack that helps keep one feeling full for longer.

In addition to being delicious and nutritious and also very versatile.

Overall, seed crackers are a tasty and healthy alternative to traditional crackers, offering a range of nutritional benefits and versatility in their uses.

Seed crackers can be enjoyed on their own as a snack, or paired with toppings such as hummus, avocado, or nut butter for a more filling and nutritious snack.

You can also try:  Banana yogurt smoothie, herb rice with paneer manchurian,

Ingredients required for seed cracker

1/4 cup chia seeds

1/2 cup water

1/4 cup salt

1/4 cup melon seeds

1\4 cup pumpkin seeds

1/4 cup sunflower seeds

Method to prepare seed crackers

Firstly, Mix the chia seeds, salt an water together in a bowl and allow it to set for 30 min till the seeds swell up.

After 30 min mix the remaining seeds into the chia seeds.

Place a non-stick pan on a gas stove and turn the heat to medium-low

Then, grease your tray and spread the mixture evenly.

After that, use an off set spatula or back of a spoon to spread the mixture evenly on tray.

Place the seed discs on the non-stick pan and cook for about 3-5 minutes on each side or until they turn golden brown.

Now, check after 15 minute to make sure its not burning.

Remove the seed crackers from the pan and let them cool on a wire rack. You can store them in an airtight container.

Cool it down break into desired size and shape and store in an air tight container.

You can serve it with any dip of your choice.

If you are struggling shedding weight. You can talk to us by taking this assessment: Click here

For more information click here

Soya tomato salad

How to make soya tomato salad

Soya tomato salad is a recipe made up of hung curd, spices, soya & tomato the main ingredients. This recipe is nutritious and light. People who are health freak an add to their diet too. Soya tomato salad can be included in a light dinner meal. Its is a good alternative for vegetarian people. In this salad recipe, curd is used as a dressing, however one can also add one more dressing of own choice. So try this delicious yet healthy recipe and make nutritious salads a part of your diet.

List of 31 different types of salads for your reference is here

Ingredients for Soya tomato salad-

1/2 cup soya nuggets

1 med. tomato

Tablespoon -01 hung curd  (approx.)

1 pinch salt

1 pinch red pepper

1/4 teaspoon tomato ketchup

1 pinch Black pepper

Corriander leaves- few

Method –

In a bowl add 2 cup water. Boil the water and add soyabean chunks  to it.

Once soya become soft. Drain, cool, squeeze the chunks and keep them aside.

Side by side chop tomatoes (dice them).

In a bowl mix spices and curd as well then chill it in the refrigerator.

Now take a pan and heat it. Add the boiled soya chunks in it and stir-fry them till they turn golden in colour. Stir-frying will give a crunch to the salad recipe.

Keep the stir fried chunks aside.

Let them cool down to room temperature.

Now pour the chilled dressing on it and mix well.

Sprinkle some coriander on top of it (garnishing).

Again refrigerating for a while is an option.

Serve and enjoy !

For more recipes: Click here

If you are facing issues in dropping your weight, please take this free-body type assessment: Click here

Bread kheer recipe

How to make bread kheer in 2 minutes?

Bread kheer with bread, milk and sugar gives a brand new twist to a classis sooji kheer. This is a Indian dessert that is made by cooking chunks of bread in milk.

Bread kheer is a tasty dessert recipe. Dessert after dinner is a regular occurrence at my place, so I try to experiment with various dessert recipes. This bread kheer recipe is filled with the goodness of protein, calcium and other important nutrients.

However, to make it even richer and more appealing, you can add nuts like cashew, almond walnut and garnish with pistachios long with a sheet of silver paper. This works like a charm bread to elevate this bread kheer.

Furthermore, if you are bored of your regular Sooji kheer or rice kheer, then you should try this bread kheer for a change.

Also learn how to make amazing Banana yogurt smoothie!

So, let’s quickly have a look at the recipe!

Preparation time: 5 min

Cooking time: 20 minute

Total time: 25 minute

Serving: 2

Ingredient required for bread kheer

2 sliced bread

1.5 cups milk

3 teaspoons sugar

Nutritive values

Energy: 422 kcal

Protein: 15.9 gram

Carbohydrate: 52.8 gram

Fat: 16.6 gram

Method of preparation

Firstly, chopped off the brown corners of the bread using scissors.

Secondly, take a bowl quarter- filled with water, now put the corner -cut bread in the water and let it soak for half minute.

Take the soaked bread your palm and press it with another hand to remove excess water.

Do this with both slices of bread.

After removing the excess water from the bread.

Heat a pan or large vessel and add 2 cups of milk and cook for one minute.

Furthermore, add the soaked bread to the milk by mashing it with your hand and continuously stirring to avoid lumping of breads.

Now, add sugar and and mix everything gently and simmer for two minute.

The Kheer will start to thicken.

Lastly, top it with nuts like almond, cashew, grated coconut, etc.

Finally serve hot, topped with sheets of silver paper.

For more information click here

If you are struggling to shed weight, you can talk to us by taking this assessment: Click here

Starch free rice recipe

How to make healthy starch-free rice at home?

Starch-free rice is a type of rice that has been specially processed to remove starch content. You can use rice without starch in a variety of dishes, such as stir-fries, salads, soups, and sushi etc. Starch free rice is available in different forms, such as white rice, brown rice etc.

Starch free rice
Saucepan of rice in boiling water on a gas hob

You can also try: Hare Leshan (green garlic) ki sabji in the simplest methodMatar ka nimona (green peas curry) in U.P. style, herb rice with paneer manchurian!

Method to prepare starch free rice

Firstly, rinse the rice in a fine-mesh strainer under cold water for a minute.

Then, add the rice and water to a pot in a 1:2 ratio (rice to water) and bring it to a boil.

Now, when the water reaches boiling point, reduce the heat to low and cover the pot with a lid.

After that, simmer the rice for about 15-20 minutes.

Now, turn off the heat and let the boiled white rice rest for another 5-10 minutes. Remove the extra starch water after the rice is cooked properly.

Finally, starch free rice is ready to serve.

You can enjoy this starch free rice with dal, sabzi, chicken fish etc.

Pro tip: To reduce your cooking time of starch free rice, soak the rice in cold water for 25-30 minutes.

Health benefits of starch free rice

The Primary health benefits of starch free is lower glycemic index.

Starch free rice is best to achieve weight loss and stay within a calorie deficit.

Medical diets, like diabetes or digestive disorders, frequently incorporate starch free rice.

Starch free rice are nutrient-dense, rich in essential vitamins and minerals such as iron, zinc, and magnesium.

These nutrients support healthy bones, muscles, and immune function.

If you are struggling shedding weight. You can talk to us by taking this assessment: Click here

For more information click here